Welcome to the official walkthrough for Mary le Chef – Cooking Passion! Mary is a talented law student and aspiring chef, but her family’s dreams for her don’t reflect her own. Mary will have to choose her own path as she tries to balance her career with her goals. It’s multitasking to the extreme! Thankfully, our official walkthrough is designed to help you with just that. Here you can find in-depth strategies for every level and challenge, as well as mice locations, trophy how-to’s, and even a few secrets along the way. Choose a topic from the Contents below to get started!
Contents
General Tips & Tricks
If you’re just starting out or simply need a few pointers, this section is dedicated to introducing you to the game and its mechanics. Learn how the game works, as well as a few tips and tricks along the way!
How to Play
Once you’ve launched Mary le Chef, simply click “Play”! You will be taken to the Map – a level select screen. Move your cursor to the left and right edges of your screen to navigate between level select screens, or use the arrows in the lower left and right corners to move the map.
Mary le Chef – Cooking Passion is a time management game. The goal is to serve every customer that enters your restaurant before time runs out at the end of the day. The happier your customer, the higher your score will be!
To serve a customer an order, click on the products they ask for. These items will be placed on your tray in the lower left corner of your screen. Click on the customer, and try to take the products they ask for back to them as quickly as possible. Once a customer is finished eating, they will go to the cash register. Click on the cash register to check them out and receive a score. If a customer has left a table, a “!” bubble will appear, meaning the table needs to be cleaned. Clean a table by clicking on it. This will allow a new set of customers to sit down and enjoy their meal.
Scoring and Hearts
A happy customer means a high score! Customers in your restaurant will have between 1 and 5 hearts over their head at any given time. An angry customer will have 1 heart, while a happy customer will have 5. Giving customers the items they ask for in a timely manner will make the number of hearts they have increase. However, doing so slowly, or getting the order wrong, will make them unhappy, causing their hearts to decrease. If a customer loses all of their hearts, they will leave the restaurant – and the check!
You can earn additional score bonuses by improving your menu, or by buying upgrades for your restaurant. You can also earn additional points by finding the mice hidden in each of the game’s 60 main levels. Do your best and try to earn 3 stars for each level, and 1 star for bonus levels!
Mice Locations
A mouse is hidden in each level (levels 1 – 60, excluding bonus levels). Listen for tell-take squeaks and keep a sharp eye out. Mice are gray and can appear in a number of places. Finding a mouse increases your score, and also counts toward the trophy “Fresh Milk”. Again, mice are not hidden in bonus levels. Unlike time management games such as Delicious or Fabulous, the mice in Mary le Chef are random. That means they won’t necessarily show up in the same place every level. To see where mice can show up, visit the Mouse Locations section of this walkthrough. You can also click Mouse Location under each level to be taken straight to a screenshot showing where the mouse could be hiding!
Upgrades
Completing levels will reward you with coins, which you can use to buy upgrades for your restaurant. There are two kinds of upgrades you can unlock: Store and Menu.
- Store – The Store is opened automatically when you select a level from the map. You can buy upgrades for your restaurant here. Upgrades can improve customer patience, tips, and even how fast Mary can move and cook! Click on an item to view upgrade options.
- Menu – Alternatively, the Menu is opened automatically when you select a level from the map. Here you can customize your menu. Click on a menu item to view options. Menu items you unlock often have special bonuses, such as quicker prep times or bonus tips.
Click on the Store and Menu buttons at the bottom of the screen after selecting a level to alternate between restaurant and menu upgrades.
Additional Tips and Tricks
- Diamonds are a girl’s best friend! Complete the diamond challenge for each level to earn Diamonds. Diamonds can be used to purchase gifts. Click on the Diamond button in the upper right corner of the level select map, then click on a present to unlock it.
- Sure – I can multitask! Click on multiple items to stack Mary’s tasks while playing. Clicking ahead is a good way to keep Mary moving and serving customers quickly.
- Stock the shelves! The start of a level is a great time to restock on items. Items with numbers beside them mean they’re available in limited numbers. Make sure you keep these stocked, otherwise you may end up falling behind later in the day.
- Tag, you’re it! The cash register is your go-to checkpoint. In other words, you don’t have to idly stand by a table after serving a customer. Instead, click on the cash register to navigate the restaurant faster.
- The more, the merrier! Serve and check out multiple customers at the cash register at once when you can. It will help keep things flowing smoothly.
- Can’t you see my hands are full? Whenever possible, try to serve customers full orders at once. A full order is serving a customer everything they asked for in one trip. Doing this will provide bonuses to your score.
- I can’t wait to be seated! Keep tables clean by clicking on them when a “!” bubble appears after a customer has left. A customer won’t sit at a dirty table. If you have no clean tables, they’ll simply walk out.
- Customization is king! You will unlock new, exciting items to put on your menu as you play. Make your menu unique by customizing it. Customizing a menu often goes a long way in improving your overall score. You can even unlock items that can’t be burned or spilled!
Mary le Chef – Cooking Passion Walkthrough
Welcome to the official walkthrough for Mary le Chef – Cooking Passion! This is the official complete guide, containing everything from levels, bonuses, mice, trophies, tips, tricks, and more! Get started by choosing a section from the list of Contents above, or continue scrolling to dive right into the game. If you prefer visual help, refer to the Video Walkthrough at the bottom of our guide. Without further ado, let’s get cooking!
Chapter 1 – Carlos’ Restaurant
Juggling both her law career and her dreams of becoming a chef, Mary works part time at Carlos’ Restaurant.
Introduction
Meet Mary – an aspiring chef! Someone special has shown up to introduce herself and show Mary the ropes, including how to catch those pesky mice! Click on the mice to make your way through the introduction and on to the first level.
Level 1 – Best of Both Worlds
Diamond Challenge: Make sure every customer is happy.
Mouse Location: Click here to view mouse locations for this restaurant.
Today’s goal is very straight-forward: make sure every customer leaves happy. The hearts over a customer’s head indicates how happy they currently are. 1 heart indicates a customer is angry, while 5 hearts indicates a customer is ecstatic. Serve customers in a timely manner, trying to keep them at 4-5 hearts. If a customer’s hearts are depleted entirely, they will storm out. Keep them happy and you’ll earn today’s diamond.
Level 2 – A Full Plate
Diamond Challenge: Help Mary find time to study her law book on the side.
Mouse Location: Click here to view mouse locations for this restaurant.
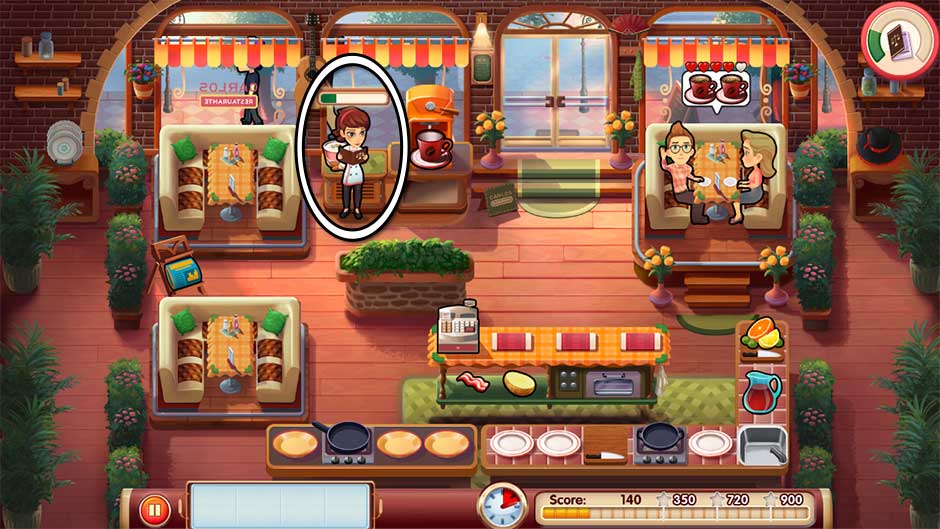
Mary’s law book is located to the left of the coffee machine. At the start of the day, a “!” bubble will appear over the book. Click on it to have Mary study. A meter will appear and slowly fill up as she does so. But don’t forget to serve customers! Serve customers as they order, then immediately go back to studying. Finish studying and fill the bar by the end of the day to acquire today’s diamond.
Tip! To keep yourself paced, make sure the study bar is half-full by the time the day is halfway done.
Mary le Chef – Cooking Passion – Level 2
Level 3 – Double Trouble
Diamond Challenge: Mary has to pick up the items she knocked over.
Mouse Location: Click here to view mouse locations for this restaurant.
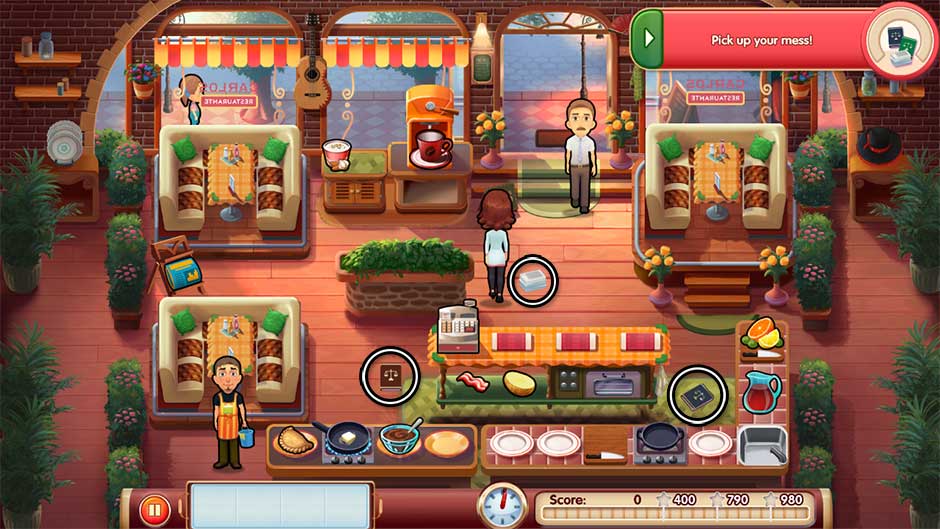
Some of Mary’s law materials have been scattered on the floor. Pick up all 3 before the end of the day to achieve today’s goal. Their locations are pictured here:
Mary le Chef – Cooking Passion – Level 3
Level 4 – Ahead of the Game
Diamond Challenge: Help Mary write down recipes.
Mouse Location: Click here to view mouse locations for this restaurant.
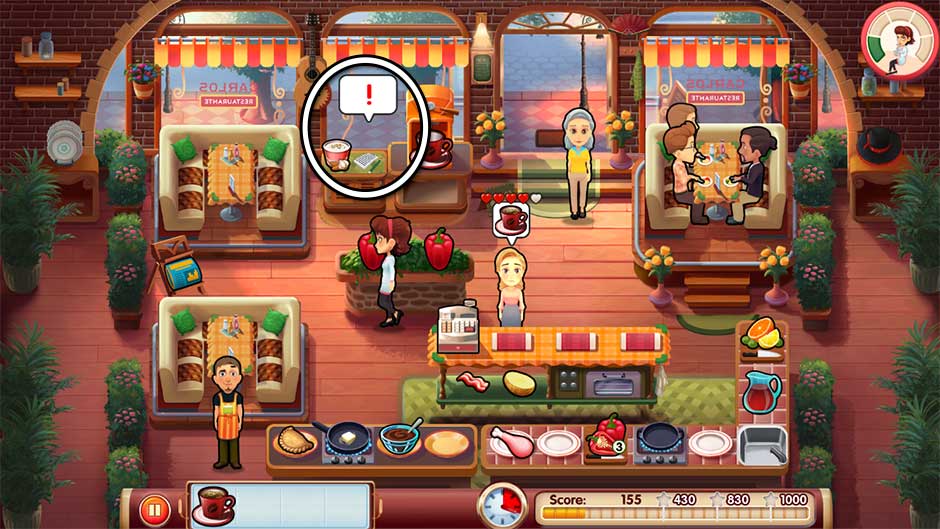
A notepad and paper can be found to the left of the coffee machine. Throughout the day, a “!” bubble will appear over the notepad. Click on it when it appears to have Mary go to it and write down recipes. You will need to do this 5 times before the end of the day to complete today’s goal.
Tip! If you’re mid-order when the “!” notification appears, finish serving the order first. However, don’t start any new orders until you’ve clicked on the “!” bubble.
Mary le Chef – Cooking Passion – Level 4
Level 5 – A Glass Half Empty
Diamond Challenge: Unpack the decorations for the party and place them around the restaurant.
Mouse Location: Click here to view mouse locations for this restaurant.
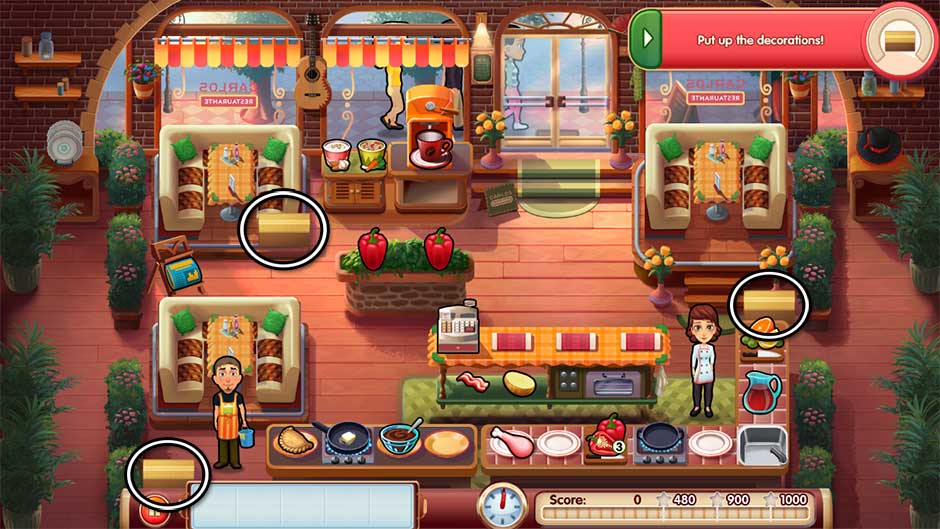
There are 3 boxes of decorations waiting to be unpacked. Click on each of the boxes to have Mary unpack them. Unpack all 3 before the end of the day to earn today’s diamond. The box locations are pictured here:
Mary le Chef – Cooking Passion – Level 5
Level 6 – Follow Your Heart
Diamond Challenge: Prepare all of the dishes.
Mouse Location: Click here to view mouse locations for this restaurant.
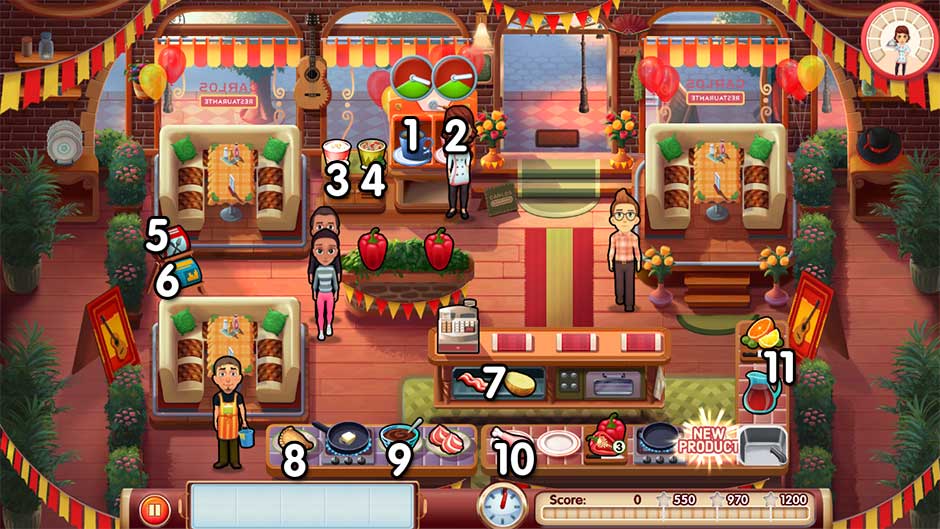
Today’s diamond challenge requires you to prepare all of the products and variations possible in the restaurant. There are 11 possible variations you will need to make before the day is done:
- Coffee (left variant – most likely Latte)
- Coffee (right variant – most likely Expresso)
- Soup (left variant – most likely Ajoblanco)
- Soup (right variant – most likely Vegetable)
- Recipe Magazine
- Newspaper
- Baked Potato (alternative: Baked Avocado)
- Empanada with topping, no jam
- Empanada with jam and topping
- Paella (Chicken or Shrimp)
- Sangria
Tip! Try and make each of these products in the same general order as listed above to help you keep track. Products will be crossed off the list as you make them for customers, however, it can be easy to forget something. Therefore, try and make each of these products as quickly as possible at the start of the day. You can click on any extra items on your tray to remove them and make room for more.
Tip! Today is the perfect day to upgrade the coffee machine if you haven’t already. After selecting the level in the Map, click on the Store button at the bottom of your screen. Click on the coffee machine and upgrade it. This upgrade will allow you to make coffee without it ever spilling, which proves particularly useful today now that you have multiple varieties to offer.
Mary le Chef – Cooking Passion – Level 6
Level 7 – More Than You Can Chew
Diamond Challenge: Repair the coffee machine before too many people leave dissatisfied.
Mouse Location: Click here to view mouse locations for this restaurant.
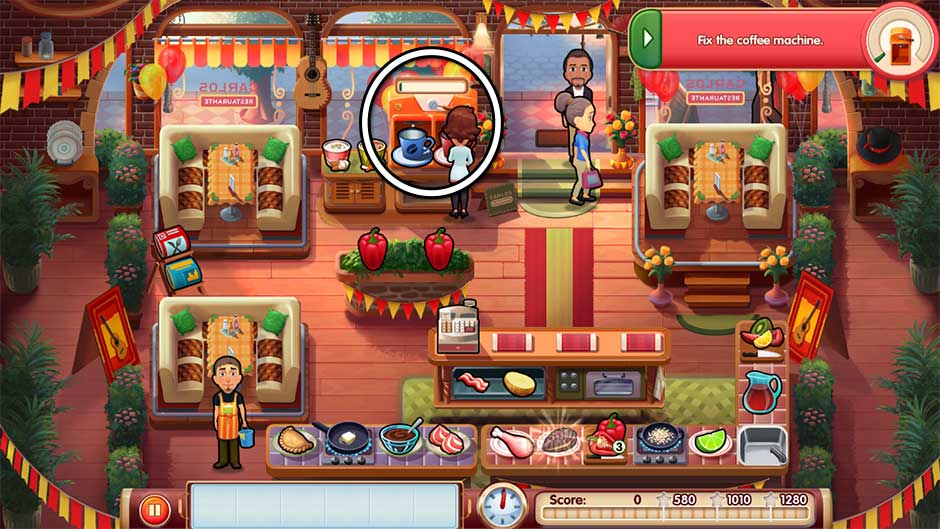
Oh no, the coffee machine is broken! And no coffee means angry customers. Click on the coffee machine to repair it. A bar will appear over the machine showing how much progress Mary has made. Finish fixing the machine before the end of the day to earn another diamond.
Tip! Work on repairing the coffee machine as often as possible. Check the day’s clock as a comparison of where you should be. For example, if the day is halfway done, you will want Mary to be at least 50% finished with fixing the coffee machine.
Tip! If customers order coffee while the machine is still being fixed, there’s a good chance they will leave angry. Therefore, fix the machine as quickly as possible.
Mary le Chef – Cooking Passion – Level 7
Level 8 – Spare Some Time?
Diamond Challenge: Just keep moving.
Mouse Location: Click here to view mouse locations for this restaurant.
Don’t stand still for longer than 7 seconds at any point during the day. It’s important to keep Mary moving! The easiest way to do this is to alternate between helping customers and preparing orders. When there are no orders, switch between clicking on the peppers in the center island and the cash register to keep her moving.
Tip! If you find yourself running out of time, it’s better to click on an item and then remove it from your tray than to let Mary stand still for too long.
Level 9 – Sticky Situation
Diamond Challenge: These aren’t the customers you’re looking for.
Mouse Location: Click here to view mouse locations for this restaurant.
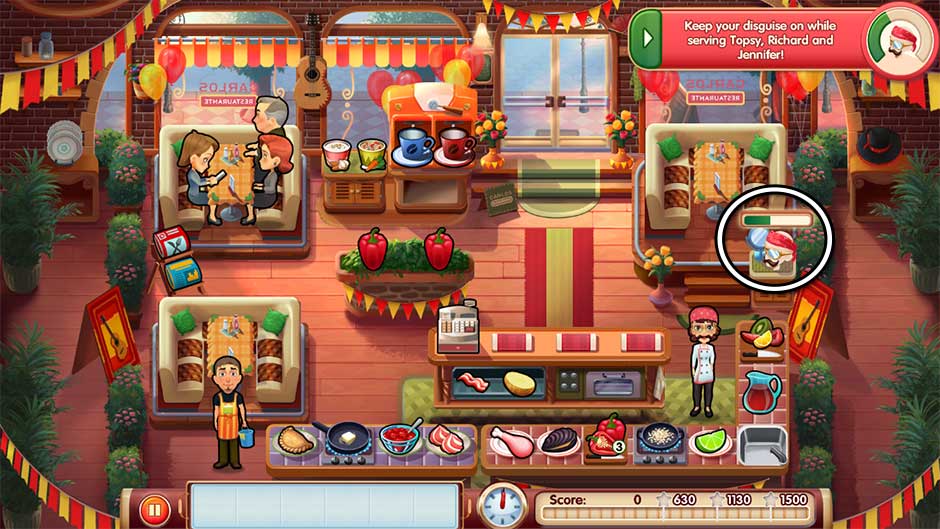
Keep your disguise on while serving Topsy, Richard, and Jennifer. The disguise can be found on a pedestal on the right, between the upper right table and the sangria. A meter over the disguise will slowly deplete over time. Click on the disguise to have Mary readjust, and the bar will be refilled. Try to never let the bar deplete below 50%. It’s better to let the customers wait just a little longer and to keep her disguise on throughout the day.
Mary le Chef – Cooking Passion – Level 9
Level 10 – Silver Lining
Diamond Challenge: Happy critics give better scores.
Mouse Location: Click here to view mouse locations for this restaurant.
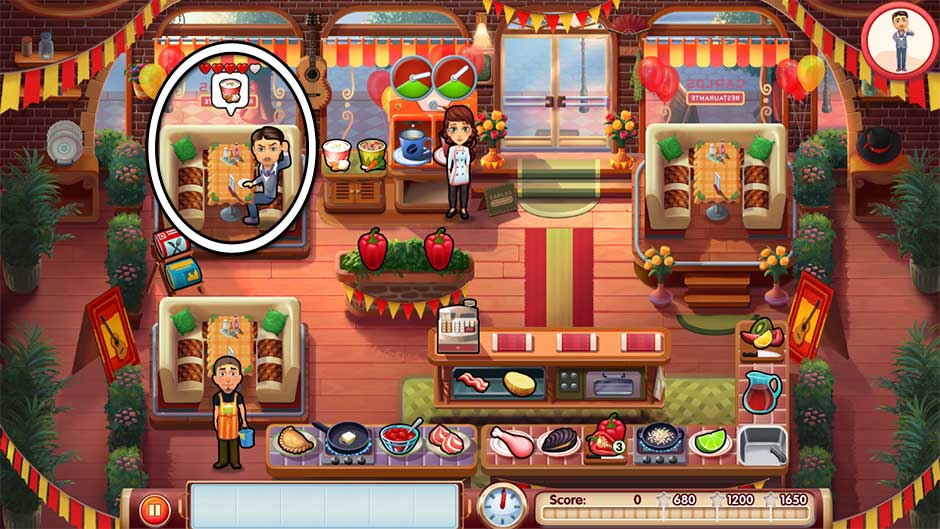
There’s a critic in the restaurant today, and he’s taken the upper left table all for himself. Throughout the day, the critic will order single items just as a normal customer would. However, place your priority on serving the critic first and foremost. If you’re busy serving someone else, try to serve the critic at the same time and create a combo. Otherwise, focus on serving the critic immediately. The other customers can wait a little longer. Complete today successfully keeping the critic happy to earn yourself another diamond.
Mary le Chef – Cooking Passion – Level 10
Chapter 2 – Sophie’s Restaurant
Aunt Sophie owns a charming French patisserie. Things are sure to settle down while Mary works here… right…?
Level 11 – Keep Your Chin Up
Diamond Challenge: Just like when I was little.
Mouse Location: Click here to view mouse locations for this restaurant.
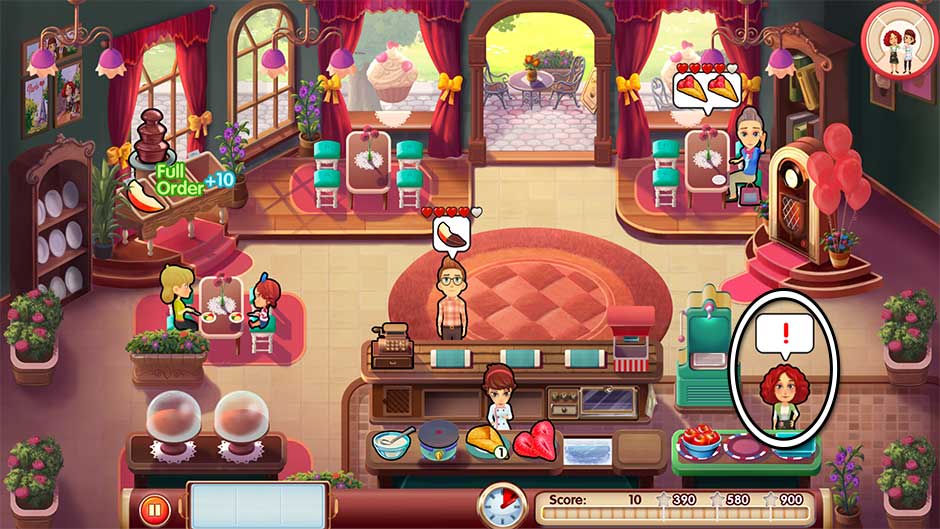
Auntie Sophie needs a little help from Mary, just like when she was little. A “!” bubble will appear over Sophie’s head when she needs Mary’s help. Click on Sophie to have Mary help her prepare her dish. Help Sophie 3 times before the end of the day to earn a diamond.
Mary le Chef – Cooking Passion – Level 11
Level 12 – The More the Merrier
Diamond Challenge: It’s all fun and games!
Mouse Location: Click here to view mouse locations for this restaurant.
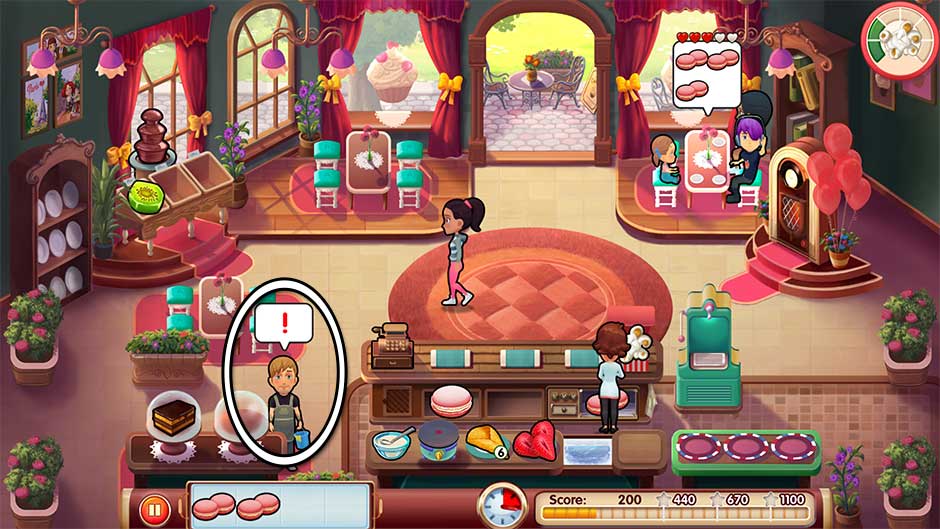
Peter and Mary are goofing around today. When a “!” bubble pops up over Peter’s head, click on him to have Mary toss popcorn at him. Do this 6 times before day’s end to complete today’s diamond challenge.
Mary le Chef – Cooking Passion – Level 12
Level 13 – Excitement Abounds
Diamond Challenge: Sophie wants help with the party.
Mouse Location: Click here to view mouse locations for this restaurant.
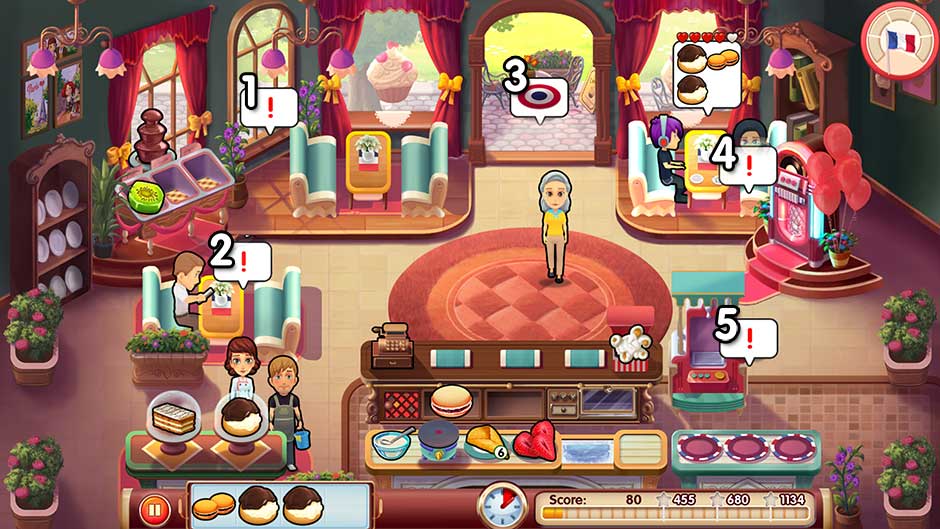
Sophie needs a little help figuring out where party decorations will go. Several “!” bubbles will appear one-by-one throughout the day. When one of these popups appears, click on it to have Mary go there and consider the decorations. Do this successfully with all 5 bubble that appear throughout the day to earn another diamond.
Mary le Chef – Cooking Passion – Level 13
Level 14 – Love is in the Air
Diamond Challenge: A very useful present.
Mouse Location: Click here to view mouse locations for this restaurant.
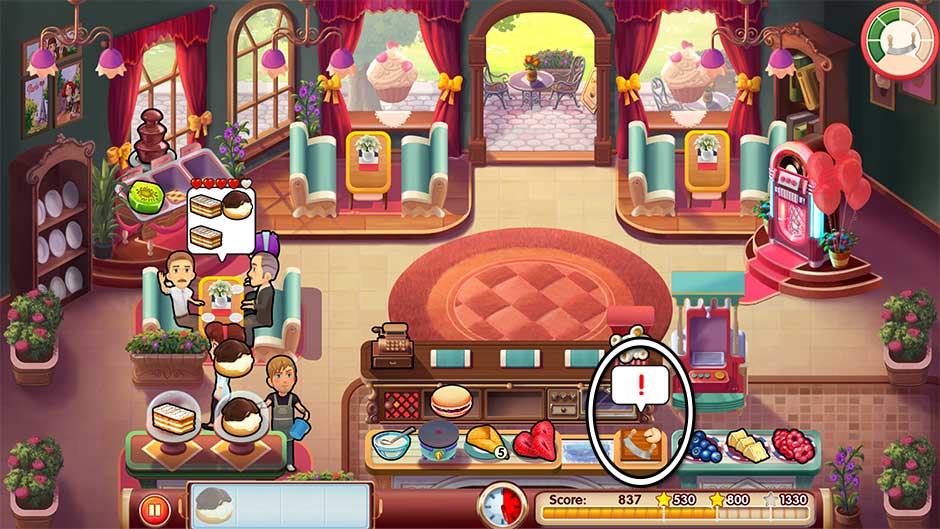
Mary’s received a very useful present – a mezzaluna for chopping herbs and nuts. With a gift this thoughtful, Mary simply can’t help herself. Use the mezzaluna 6 times over the course of the day. A “!” bubble will appear over the cutting board between the crepes and the cheese and berries. When this happens, click on the bubble to have Mary use the mezzaluna. Completing this challenge by the end of the day will reward you with a diamond.
Mary le Chef – Cooking Passion – Level 14
Level 15 – It’s Complicated
Diamond Challenge: So many boxes.
Mouse Location: Click here to view mouse locations for this restaurant.
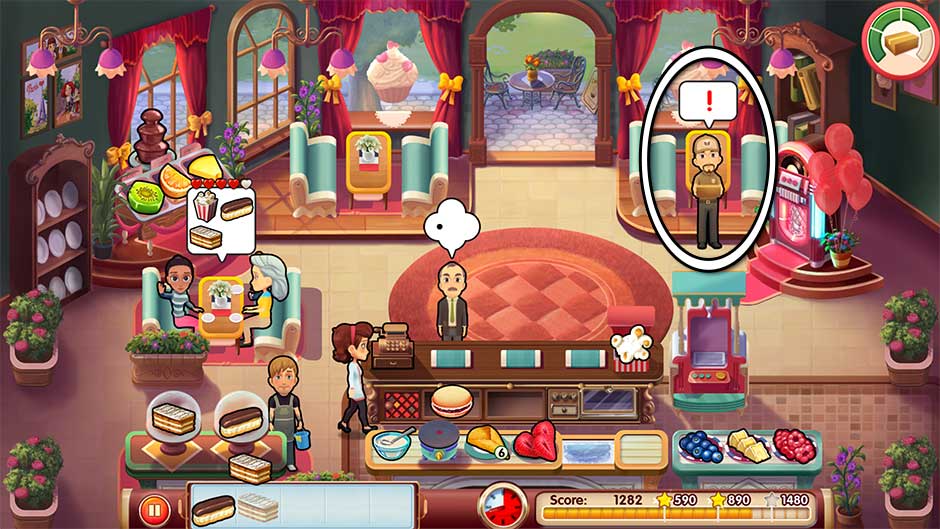
There’s a lot of incoming packages today. Throughout the day, the postman will arrive with packages for the party. A “!” bubble will appear over his head when he’s ready for you to collect a package. Click on him to collect it. Any tasks you may currently be doing will be put on hold while transporting the package. However, try not to wait too long. Collect all 4 packages before the end of the day to complete today’s challenge.
Tip! The postman will stand below the table in the upper right corner near the jukebox.
Mary le Chef – Cooking Passion – Level 15
Level 16 – Prime of Her Time
Diamond Challenge: The fastest way to a man’s heart is through his stomach.
Mouse Location: Click here to view mouse locations for this restaurant.
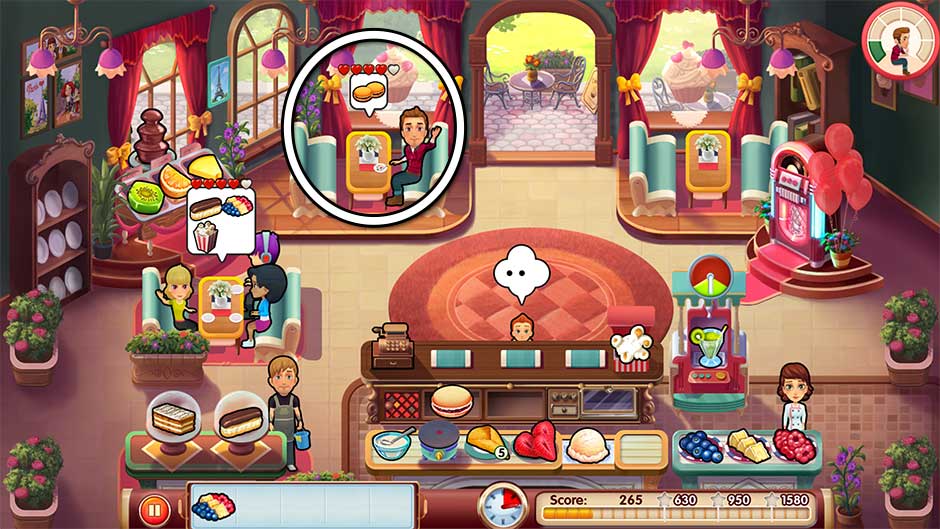
A handsome customer, James, will be sitting at the table on the upper left today. He’s quite the hungry gentleman, and will make several orders throughout the day. Your challenge is to bring the items he orders to him quickly to keep him happy. Serving James is just like serving any other customer. However, his hearts don’t reset. Try to serve him as quickly as possible and not keep him waiting too long. If you serve him 6 items he asks for without him becoming upset, you will earn a diamond.
Tip! Try upgrading the table on the upper left before starting the level to increase James’ patience. You can also use the jukebox to improve his mood.
Mary le Chef – Cooking Passion – Level 16
Level 17 – Stir Crazy
Diamond Challenge: The party is just around the corner.
Mouse Location: Click here to view mouse locations for this restaurant.
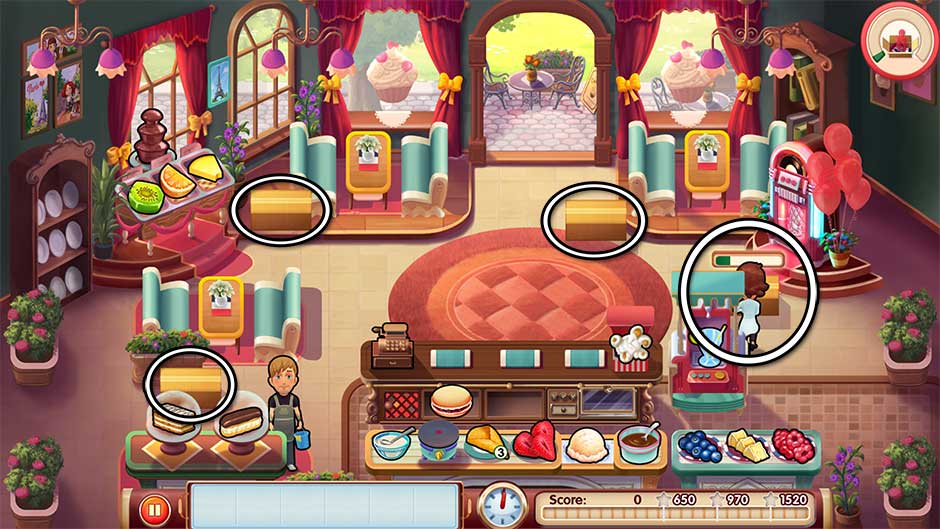
The party’s nearly here, and there’s a lot of decorations to put up. Click on the packages scattered throughout the restaurant to open them and put up the decorations. Successfully open and put up the contents of all 4 packages before the end of the day to complete today’s goal. Their locations are pictured here:
Mary le Chef – Cooking Passion – Level 17
Level 18 – Bastille Day Party
Diamond Challenge: Somebody has to be the referee…
Mouse Location: Click here to view mouse locations for this restaurant.
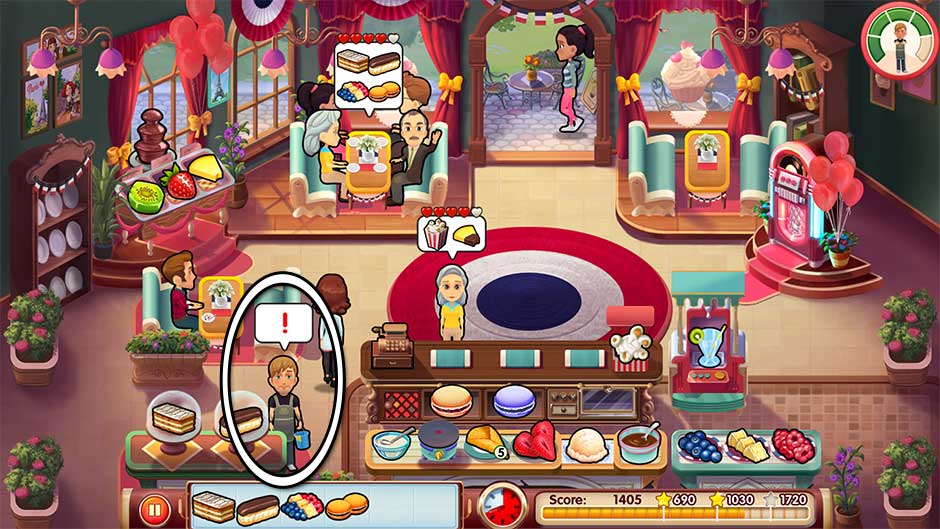
Peter’s in a bad mood, but there are more important things than fighting – there’s customers to serve! Every time Peter becomes angry, a “!” bubble will appear over his head. Click on him quickly to have Mary run interference and prevent him from getting too upset. Do this successfully 5 times before the end of the day to earn yourself a diamond.
Tip! Peter’s face will turn red and he’ll start to look angry shortly before the “!” bubble appears.
Mary le Chef – Cooking Passion – Level 18
Level 19 – Past Regrets
Diamond Challenge: Turn Sophie’s frown upside down with some sweets.
Mouse Location: Click here to view mouse locations for this restaurant.
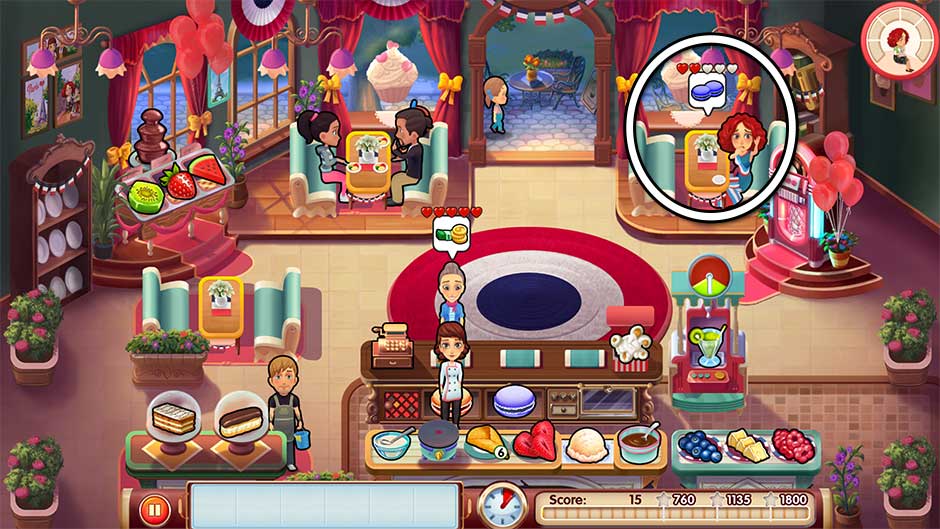
Sophie’s having a hard time, and what better way to cheer her up than with some treats? Throughout the day, Sophie will order sweet treats. Prepare these just as you would an item for any other customer, then bring it to her quickly. Sophie doesn’t have much patience, so try to serve her quickly and before other customers. Bring her all 6 items she orders without her hearts running out to earn a diamond.
Tip! You may also upgrade the table on the upper right to improve her patience, as well as use the jukebox.
Mary le Chef – Cooking Passion – Level 19
Level 20 – Moving On
Diamond Challenge: Keep the decorations where they belong.
Mouse Location: Click here to view mouse locations for this restaurant.
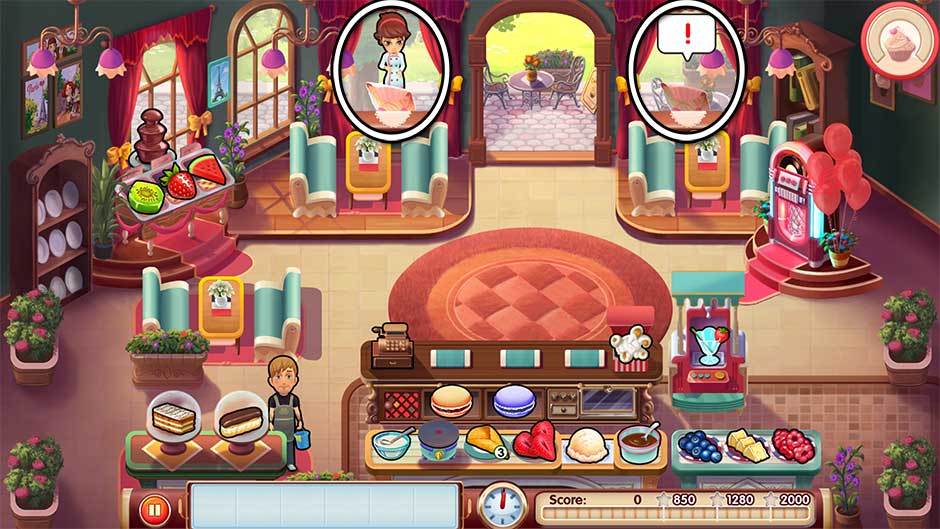
The decorations in the window are sliding down! Fix both posters before the end of the day to earn yourself another diamond. Their locations are pictured here:
Mary le Chef – Cooking Passion – Level 20
Chapter 3 – Luigi’s Restaurant
Time to trade French cuisine for Italian. This is Luigi’s turf, which Mary is quick to learn!
Level 21 – Saved by the Bell
Diamond Challenge: Show him what you’re made of.
Mouse Location: Click here to view mouse locations for this restaurant.
Throughout the day, Luigi will order items from the menu. When Luigi orders, simply serve him as you would any normal customer. Do this successfully 3 times before the end of the day to achieve your goal.
Level 22 – Not the Usual
Diamond Challenge: Help Luigi gather the elements of a great new dish.
Mouse Location: Click here to view mouse locations for this restaurant.
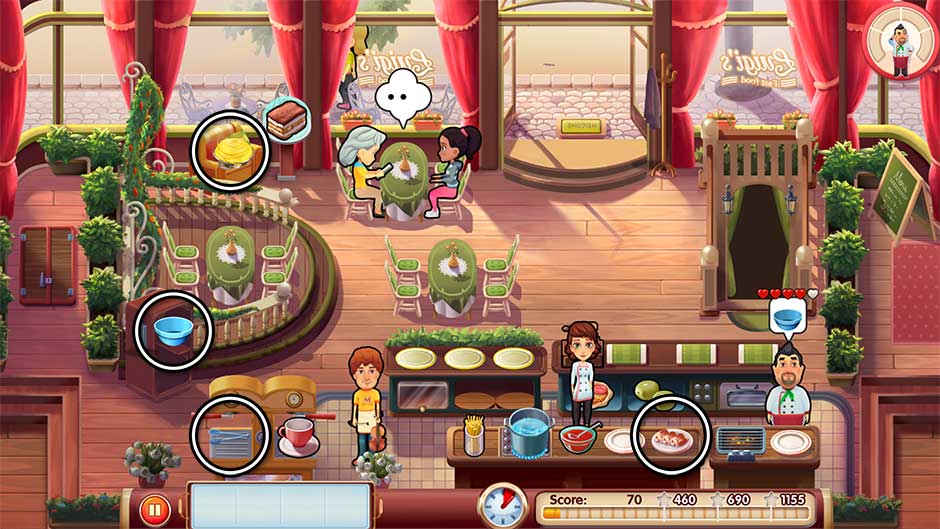
Luigi is making a special dish today, and he needs your help! Luigi is standing in the lower right corner, and will ask for components necessary to make his dish throughout the day. Find all 4 components and give them to him before the end of the day to achieve your goal. Their locations are pictured here:
Mary le Chef – Cooking Passion – Level 22
Level 23 – The Tables Turn
Diamond Challenge: Keeping the lovebirds happy!
Mouse Location: Click here to view mouse locations for this restaurant.
Jennifer and Tony are dining at the restaurant today. They will continue to order dishes throughout the day up until closing. Fulfill their orders as quickly as possible while serving other customers. You will need to keep them happy to earn today’s diamond. Try to serve them before any other customers and keep them at 4-5 hearts. Relax, you can do it!
Level 24 – Pave Your Way
Diamond Challenge: Luigi is troubled – help him come up with a menu for the party.
Mouse Location: Click here to view mouse locations for this restaurant.
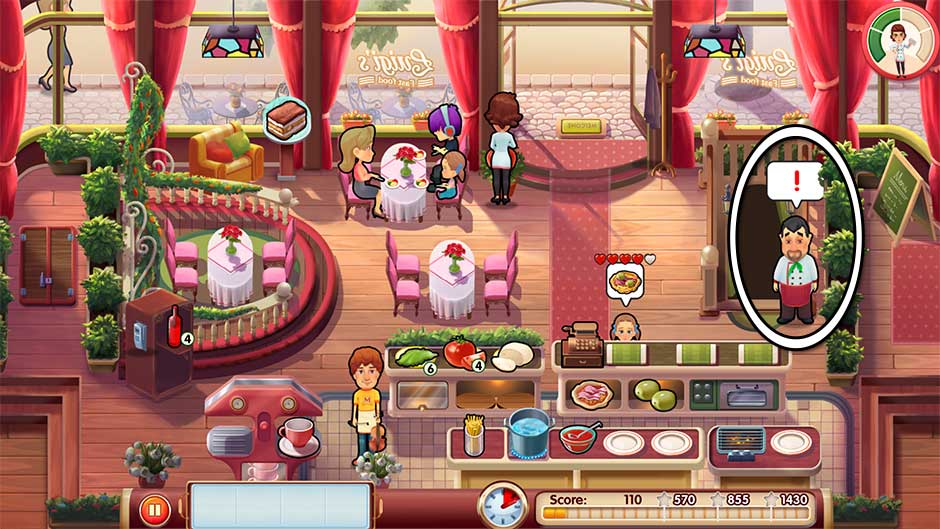
Luigi’s having a tough time today. You can find him on the right side of the restaurant today. Whenever he needs encouragement, a “!” bubble will appear over his head. Click on Luigi to reassure him. Do this 4 times before the end of today to earn another diamond.
Mary le Chef – Cooking Passion – Level 24
Level 25 – Looking Up
Diamond Challenge: Out of sight doesn’t mean out of mind – the cellar needs to be cleaned either way.
Mouse Location: Click here to view mouse locations for this restaurant.
The cellar is a mess! A “!” bubble can be seen over the entrance on the right. Click on the cellar to have Mary start to clean it. A bar will appear over the cellar showing Mary’s cleaning progress. Fill the bar completely and finish cleaning the cellar before the end of the day to earn today’s diamond.
Tip! Clean between waves of customers. By the time the day is halfway done, you’ll want the bar to be halfway full.
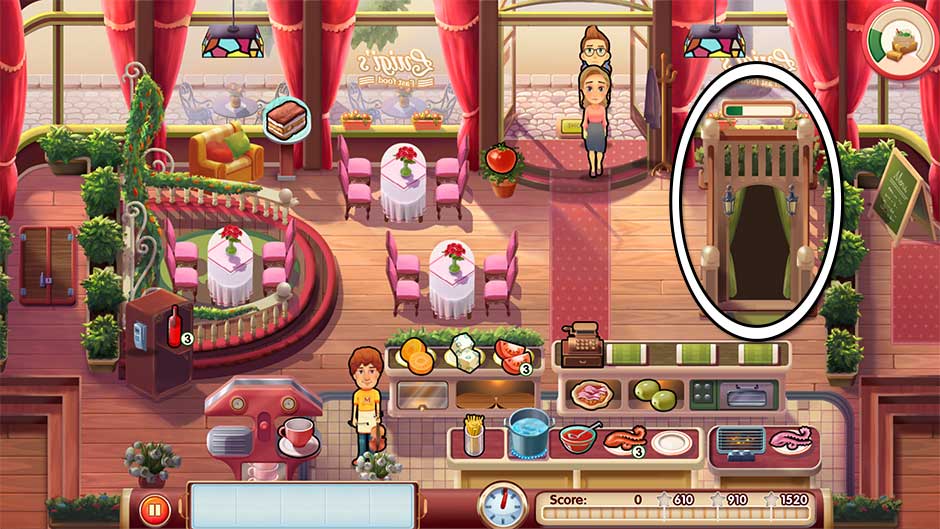
Mary le Chef – Cooking Passion – Level 25
Level 26 – Where There’s a Will…
Diamond Challenge: Cupcakes don’t belong on the floor.
Mouse Location: Click here to view mouse locations for this restaurant.
Yikes! A platter of cupcakes has been spilled all over the floor. Pick up all 4 cupcakes before the end of the day to earn today’s diamond. Their locations are pictured here:
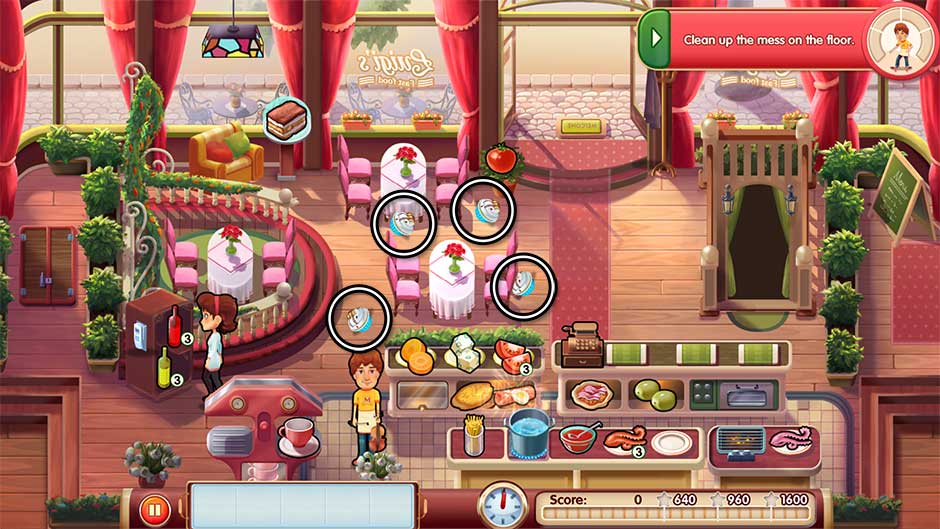
Mary le Chef – Cooking Passion – Level 26
Level 27 – Point of No Return
Diamond Challenge: Keeping good care of your inventory is a sign of a great chef!
Mouse Location: Click here to view mouse locations for this restaurant.
Fully stock all products so that all are fully stocked at the same time at least once during the day. The following items will need to be fully stocked at the same time:
- Tomato (x6). Restock by clicking on the tomato plant near the door. Tomatoes need time to grow.
- Octopus (x6). Restock by clicking on the raw octopus on the lower right and cooking it. Once cooked, click on it to add it to the stock.
- Red Wine (x6). Restock by clicking on the phone on the side of the wine shelf and collecting the package from the mailman.
- White Wine (x6). Restock by clicking on the phone on the side of the wine shelf and collecting the package from the mailman.
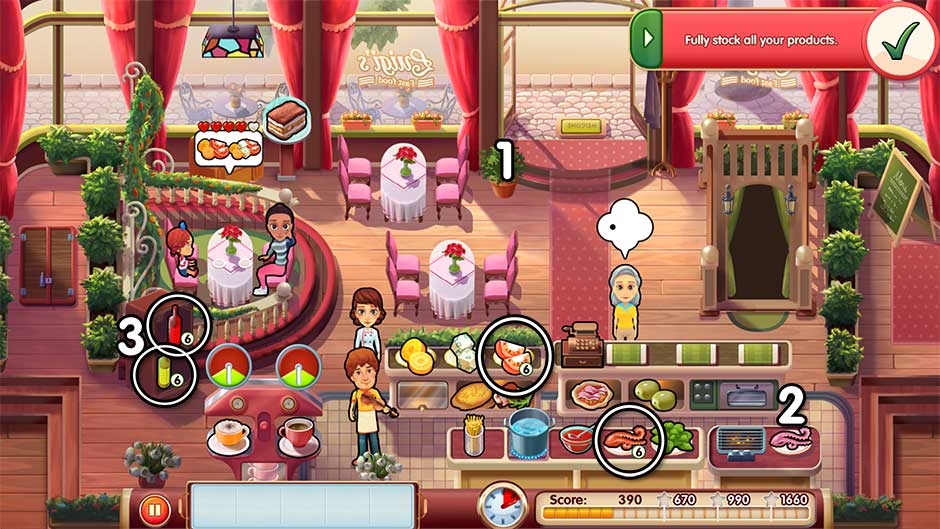
Mary le Chef – Cooking Passion – Level 27
Level 28 – Say It With a Song
Diamond Challenge: Variety is your friend.
Mouse Location: Click here to view mouse locations for this restaurant.
Don’t make the same product twice in a row. Keep careful track of customers’ orders and don’t make two of the same item back-to-back. Instead, if you are faced with two of the same item during orders, alternate with another item. Do this successfully until closing to earn a diamond.
For example: If a customer orders 2 bottles of Red Wine and 1 bottle of White Wine, pick up 1 Red Wine, then 1 White Wine, then 1 Red Wine.
Alternatively, if multiple of the same item are ordered, you can pick up another item the customer didn’t order to make sure that those items aren’t made back-to-back.
For example: If a customer orders 2 Pastas, make 1 Pasta and pick it up, then pick up 1 bottle of Red Wine, then make 1 more Pasta for the order.
Tip! You can always click an item on your tray to remove it after making it if you choose the second strategy.
Level 29 – Courage to Love
Diamond Challenge: Try to turn Jenny’s frown upside down.
Mouse Location: Click here to view mouse locations for this restaurant.
Jennifer is feeling low today. Throughout the day, she will stand near the door. When she needs comforting, a “!” bubble will appear over her head. Click on her when this bubble appears to comfort her. Do this successfully 4 times before the end of the day to earn another diamond.
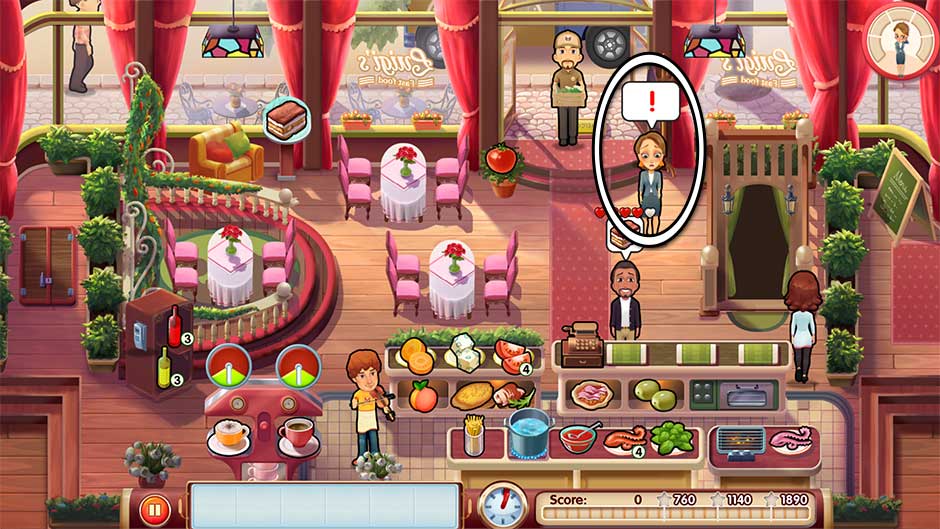
Mary le Chef – Cooking Passion – Level 29
Level 30 – Wind of Change
Diamond Challenge: Deliver Luigi’s new food to the customers for gustation.
Mouse Location: Click here to view mouse locations for this restaurant.
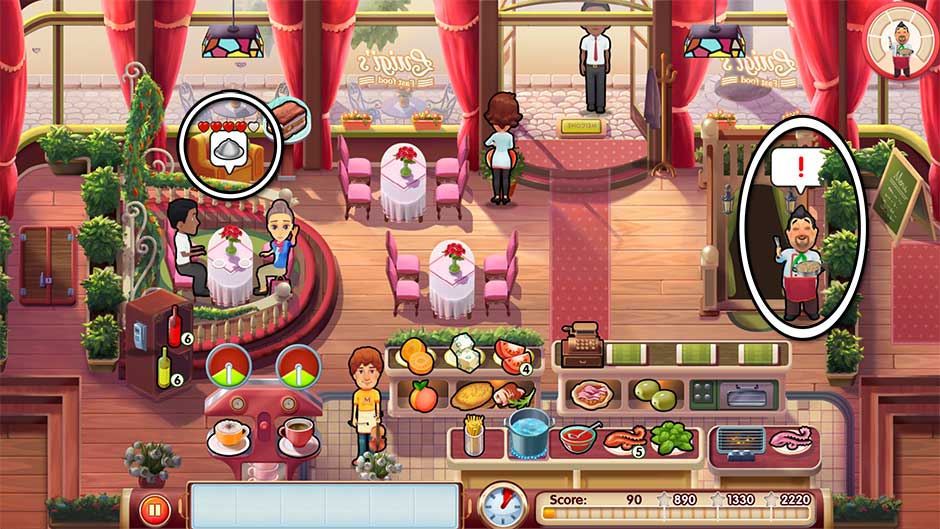
Customers are clamoring to try Luigi’s new dish! Throughout the day, customers will order special dishes. These dishes are indicated by a silver dome plate cover. When these are ordered, Luigi will appear from the cellar with a dish to serve. A “!” bubble will appear over his head. Click on Luigi to collect the dish, then take it to the customers who ordered it. Continue this process until closing to complete today’s diamond challenge.
Mary le Chef – Cooking Passion – Level 30
Chapter 4 – Farmer’s Market
There’s no fresher produce in all of Snuggford than that found at the Farmer’s Market. But Mary’s in for a surprise – the owner is Luigi’s own brother!
Level 31 – Fresh Start
Diamond Challenge: The mouse will try to eat the cheese – keep the mouse away until it gives up.
Mouse Location: Click here to view mouse locations for this restaurant.
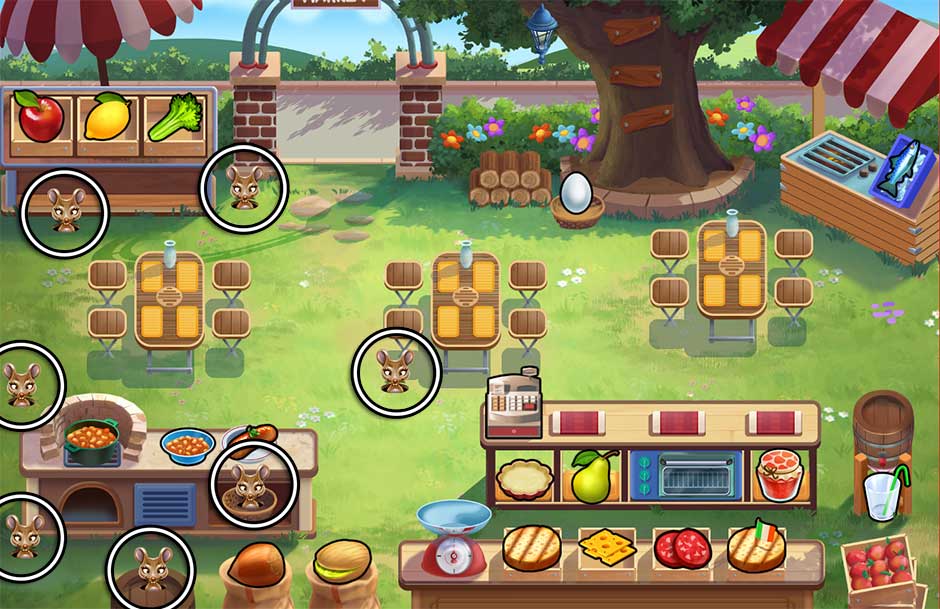
There’s a mouse that keeps showing up, and he will stop at nothing to get the cheese he craves so badly! The mouse will show up in the upper left corner of the screen near the fruit stand. Each time he will show up with a squeaking sound. Click on the mouse before he disappears. If you do this, when he reappears, he will be in the same general location. However, fail to click on him before he disappears, and he will reappear even closer to the cheese. Prevent the mouse from getting the cheese by day’s end and you’ll earn a diamond for your troubles. Refer to the screenshot below to see where today’s mouse can pop up while looking for the cheese.
Tip! Don’t confuse the mouse that’s trying to get the cheese for today’s hidden mouse! The mouse trying to get the cheese is brown and will only pop his head up out of the ground. Today’s hidden mouse is gray and will pop up both head and shoulders.
Mary le Chef – Cooking Passion – Level 31
Level 32 – Family Relations
Diamond Challenge: Keep an eye out for the delivery guy.
Mouse Location: Click here to view mouse locations for this restaurant.
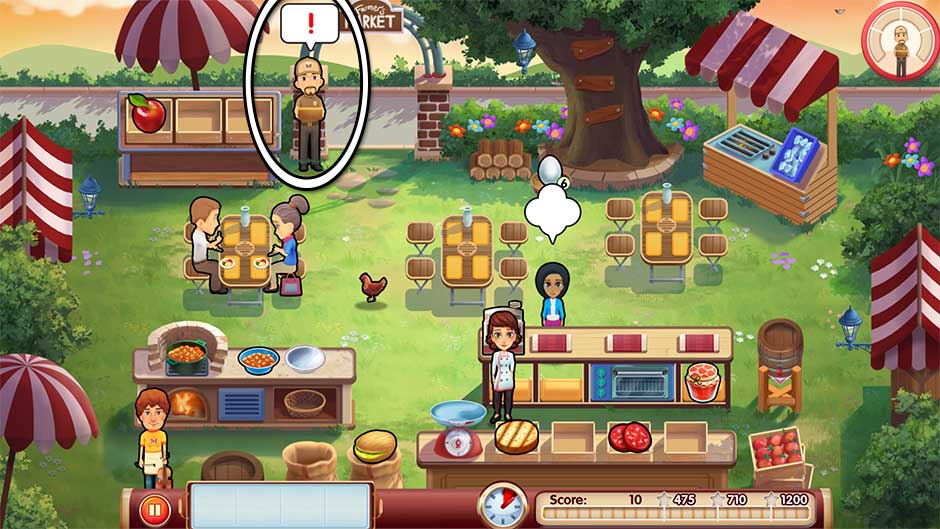
Sometime during the day, the delivery man will show up with a package. When he does, a “!” bubble will appear over his head. Click on him quickly to instantly complete today’s diamond challenge. If you fail to click on the delivery man the first time, don’t worry – he will return throughout the day.
Mary le Chef – Cooking Passion – Level 32
Level 33 – Always Room for Dessert
Diamond Challenge: Richard left the books on the table, and now customers refuse to sit there.
Mouse Location: Click here to view mouse locations for this restaurant.
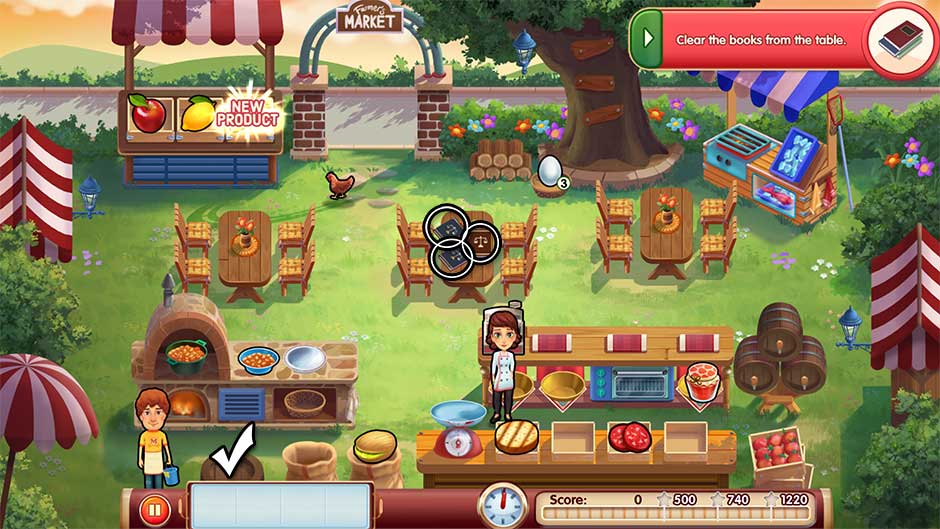
Clear the books from the top of the center table. There are 3 books total. Clear all of them off before the end of the day to earn today’s diamond. It’s a very easy task, so try to clear them all off right away before the first customer shows up. Set them on top of the barrel in the lower left corner of the screen next to Morey when finished. Their locations are shown below:
Mary le Chef – Cooking Passion – Level 33
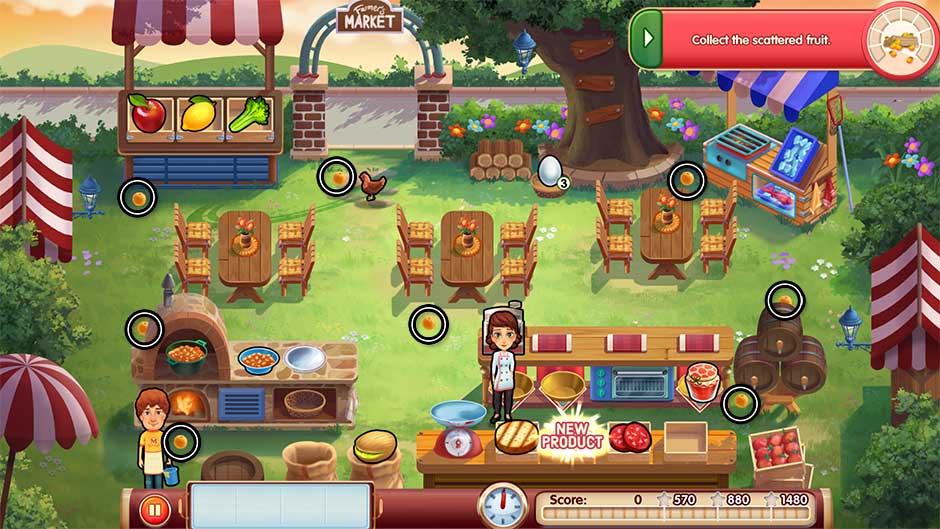
Level 34 – Safe With the Law
Diamond Challenge: They’re everywhere.
Mouse Location: Click here to view mouse locations for this restaurant.
Collect the scattered fruit. There are 8 pieces scattered all throughout the restaurant. Pick up all 8 pieces before day’s end to complete today’s diamond challenge. Their locations are pictured here:
Mary le Chef – Cooking Passion – Level 34
Level 35 – Priorities
Diamond Challenge: And you are his sous-chef.
Mouse Location: Click here to view mouse locations for this restaurant.
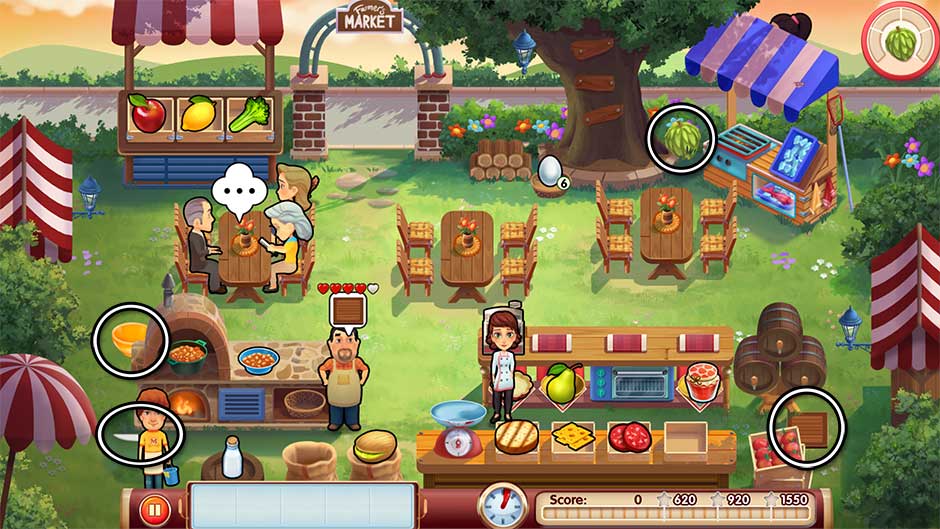
Luigi’s brother needs a helping hand around his market today. Help him prepare a special dish! Throughout the day, he will ask you for specific components and ingredients. Find all 4 items he asks for and deliver them to him before the end of the day to complete today’s goal. The item locations can be found here:
Mary le Chef – Cooking Passion – Level 35
Level 36 – A Turbulent Road
Diamond Challenge: I just can’t say no to that cute face.
Mouse Location: Click here to view mouse locations for this restaurant.
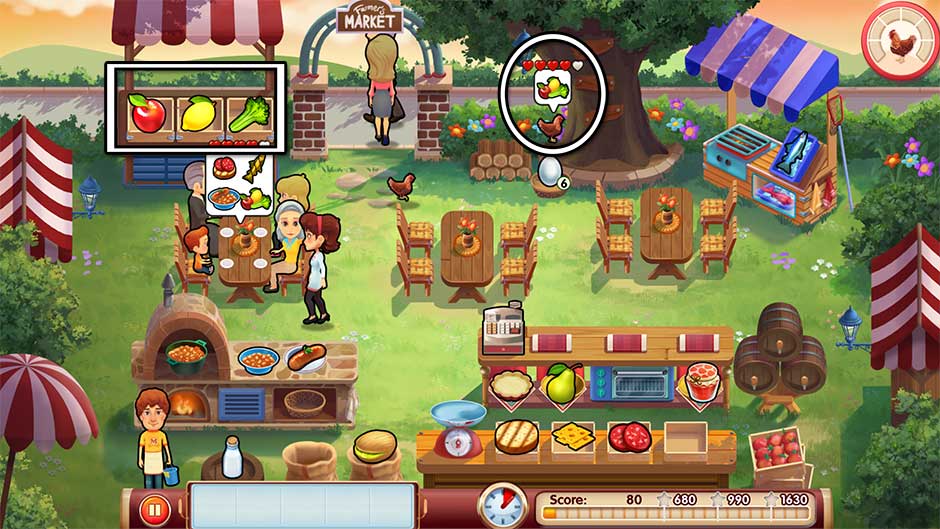
Give the chicken what she wants. No, not the chicken that wanders around and lays eggs – the chicken standing near the tree! Throughout the day, the chicken will request items. Collect the chicken’s order and click on the chicken to deliver it to her in a timely manner. The chicken has hearts like any other customer, so you’ll need to be quick! Fulfill all 6 of the chicken’s orders by the end of the day to earn a diamond.
Tip! The chicken loves fruits and vegetables! When you see the chicken start to think about their order, make your way over to the produce stand.
Mary le Chef – Cooking Passion – Level 36
Level 37 – Lawyer and Order
Diamond Challenge: Make sure your dad has a great time.
Mouse Location: Click here to view mouse locations for this restaurant.
Dad’s come to visit at the market today, and Mary’s serving him lunch! He will sit at the center table for the full day, ordering items all throughout. Serve him the items he asks for in a timely manner just as you would any other customer. Do this successfully 5 times before the restaurant closes to earn yourself a diamond, and his approval.
Level 38 – Focused Work
Diamond Challenge: It tastes funny!
Mouse Location: Click here to view mouse locations for this restaurant.
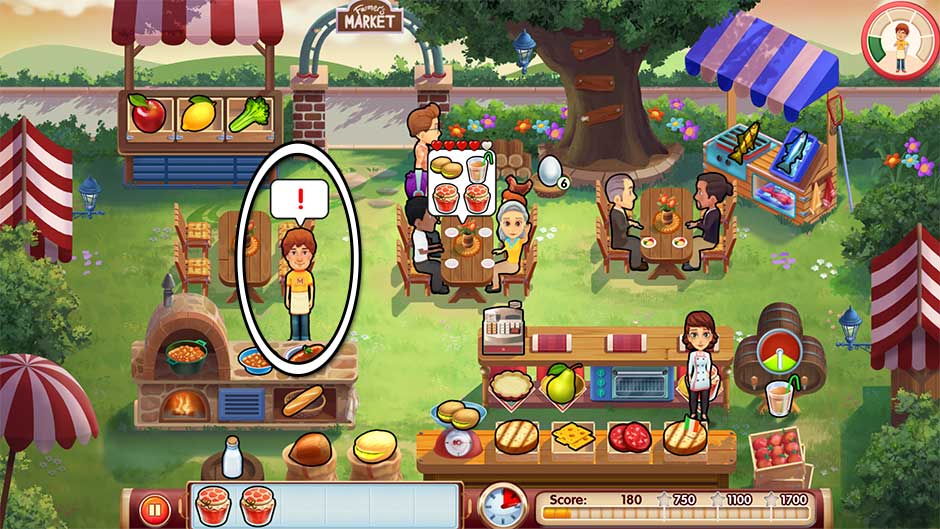
Today’s challenge is to help Morey come up with jokes. Challenging, indeed! Morey will stand in front of the table on the left. When a “!” bubble appears over his head, it’s time to help him with his material. Click on Morey to help him with his jokes. Do this 5 times before the end of the day to complete today’s challenge.
Tip! Morey practicing his jokes means there’s no one to help clean your tables today! Make sure to clean those tables as soon as your table customers check out at the register. If all tables are dirty when new customers come in, they will leave immediately without waiting.
Mary le Chef – Cooking Passion – Level 38
Level 39 – Ready or Not…
Diamond Challenge: Don’t kindle the fireplace.
Mouse Location: Click here to view mouse locations for this restaurant.
Start the day as per normal, serving customers. But as soon as the fireplace on the left goes out and the chili goes cold is when today’s challenge kicks in. Do not click on the pile of wood next to the tree to rekindle the fire until the meter in the upper right corner of the screen is completely filled and you complete today’s goal. It will take several seconds. Customers who have ordered chili in the meantime will just have to wait, sorry!
Tip! If you want to play things safe, keep an extra bowl of chili with a sausage and sour dough, as well as a bowl of chili with just sour dough on your tray. That way you can continue to serve customers who may want chili, even while the fireplace is out.
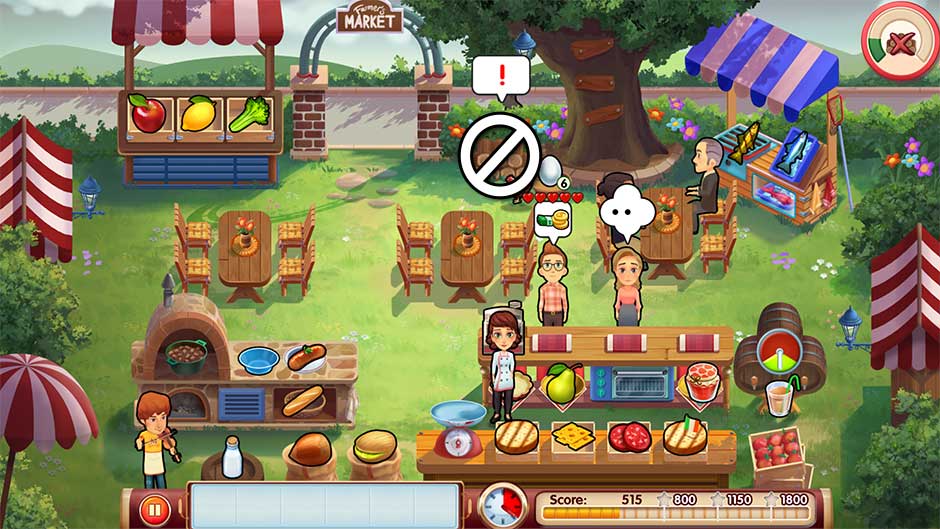
Mary le Chef – Cooking Passion – Level 39
Level 40 – Trouble in Paradise
Diamond Challenge: Let’s party no matter what happens.
Mouse Location: Click here to view mouse locations for this restaurant.
Decorate the restaurant! There are 3 boxes of decorations which need to be unpacked. Click on each of the 3 boxes and unpack their contents fully before the end of the day to earn today’s diamond. Their locations are shown below:
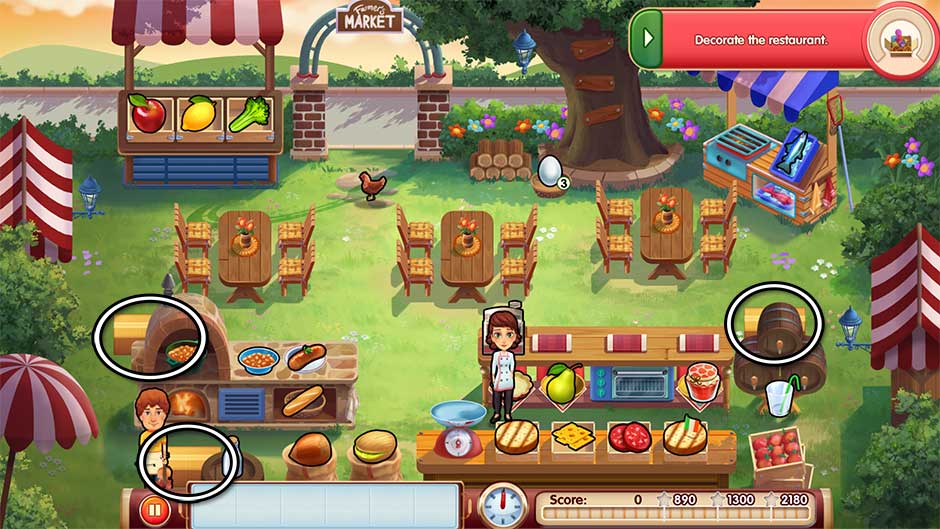
Mary le Chef – Cooking Passion – Level 40
Chapter 5 – Steve’s Restaurant
It’s time to cook the life of the rich and famous and work for Steve – a celebrity chef with an attitude. How long will Sophie last under the pressure?
Level 41 – Crumbling Down
Diamond Challenge: A worrywart gets no work done.
Mouse Location: Click here to view mouse locations for this restaurant.
Mary is terribly worried about her results, and can’t stop checking her phone! Mary’s phone is located in the lower right corner. Throughout the day, it will start to ring. When this happens, a “!” bubble will appear over it. Drop everything you’re doing and quickly click on the phone to have Mary answer it. Do this without missing a call 8 times by restaurant’s close to complete today’s diamond challenge.
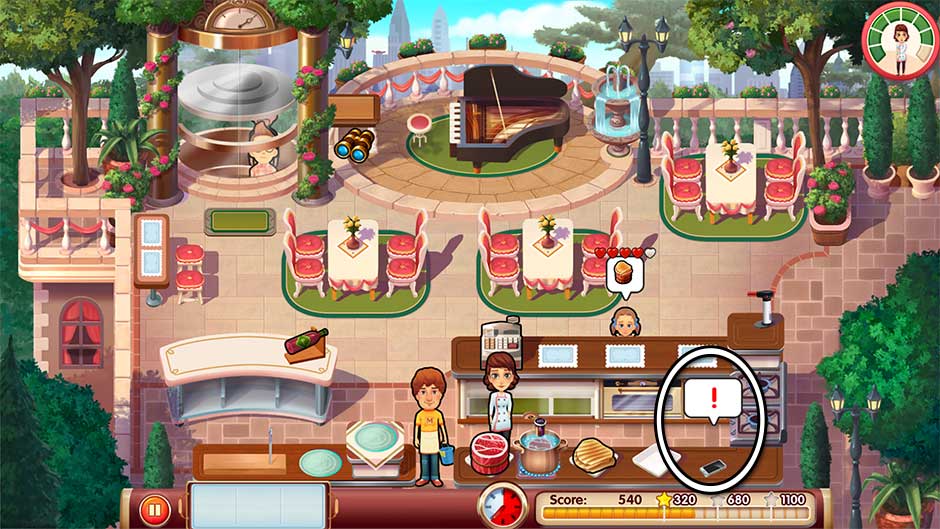
Mary le Chef – Cooking Passion – Level 41
Level 42 – Walking Away
Diamond Challenge: Sweetness and lightning. Bake your best cake for Steve.
Mouse Location: Click here to view mouse locations for this restaurant.
Today’s challenge is to bake a cake in addition to serving your customers. The cake platter is located in the lower right corner, in the same location as the cell phone from the previous challenge. Click on the platter marked with a “!” bubble to have Mary work on the cake. But don’t forget your customers! Place priority on serving them, followed by immediately working on the cake. Complete all 5 steps necessary to complete the cake before the end of the day to earn yourself another diamond.
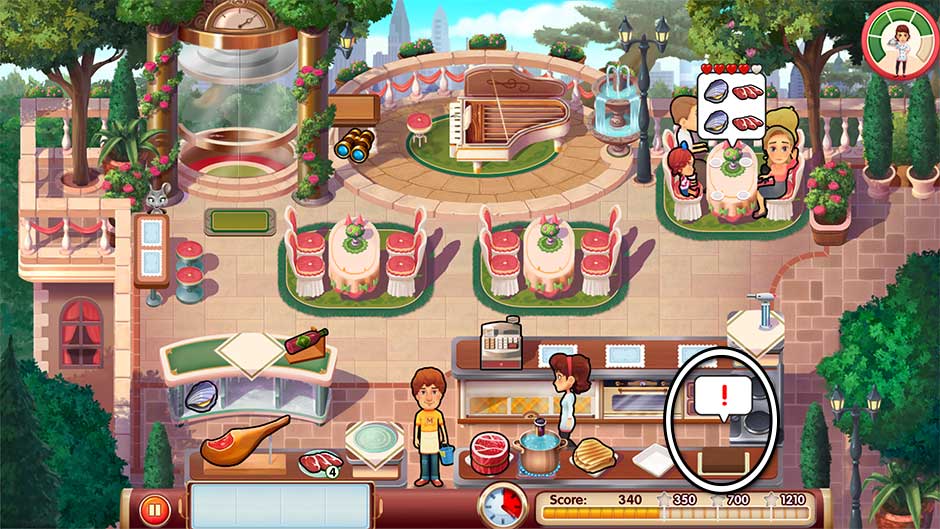
Mary le Chef – Cooking Passion – Level 42
Level 43 – Shot at a Hot Shot
Diamond Challenge: A messy workplace is the sign of a messy worker. Make sure the garden is tip-top.
Mouse Location: Click here to view mouse locations for this restaurant.
The garden is a bit of a mess with all the overgrown ivy. It’s up to Mary to sort it out! Each overgrown location is marked with a “!” bubble. Click on the ivy beneath the bubble to have Mary trim it away. Successfully trim all 3 areas before the end of the day to complete today’s goal.
Tip! The ivy above the piano is a little difficult to click. Make sure you click on the ivy and not the piano, or Morey will simply play his tunes. Don’t be discouraged if it takes a few tries.
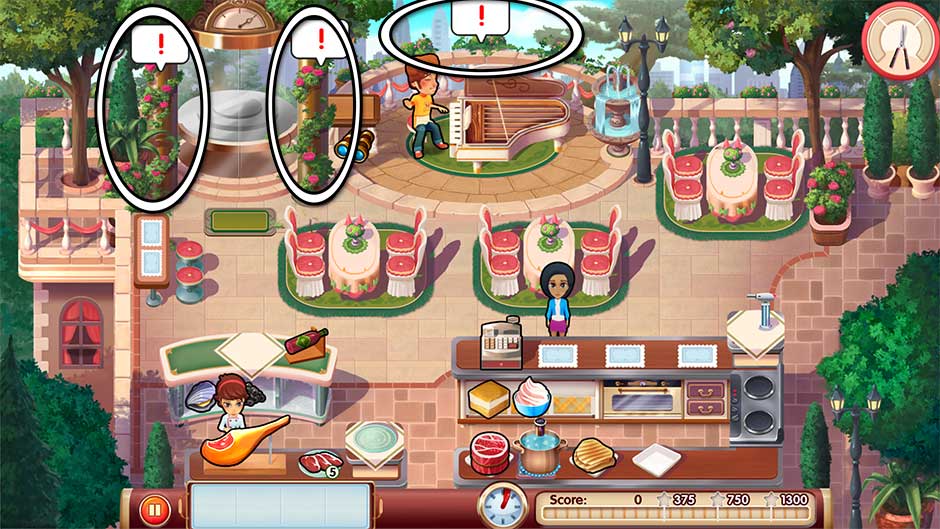
Mary le Chef – Cooking Passion – Level 43
Level 44 – All In
Diamond Challenge: He’s an excellent chef, but messy with his tools. Help him finish his dish.
Mouse Location: Click here to view mouse locations for this restaurant.
Make sure Steve has what he needs to finish his dish. Throughout the day, Steve will ask for various components necessary to complete the dish he’s making. A bubble will appear over his head showing which item he needs. Steve is a messy guy, so the items are scattered all over the restaurant. Refer to their locations below, and give all of them to him before the end of the day to earn a diamond.
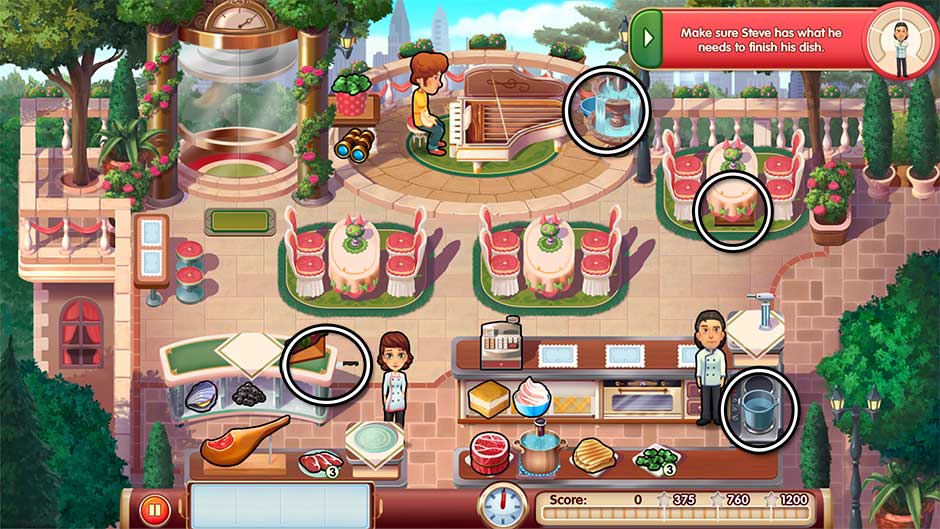
Mary le Chef – Cooking Passion – Level 44
Level 45 – Heartache
Diamond Challenge: Morey’s Music Masterpiece! But first, the piano needs some work.
Mouse Location: Click here to view mouse locations for this restaurant.
Morey needs a little help with the piano today. As he plays, he will occasionally stop and a “!” bubble will appear over his head. When this happens, click on him to have Mary go to the piano and help tune it correctly. Help Morey all 6 times he asks by the end of the day to earn a diamond.
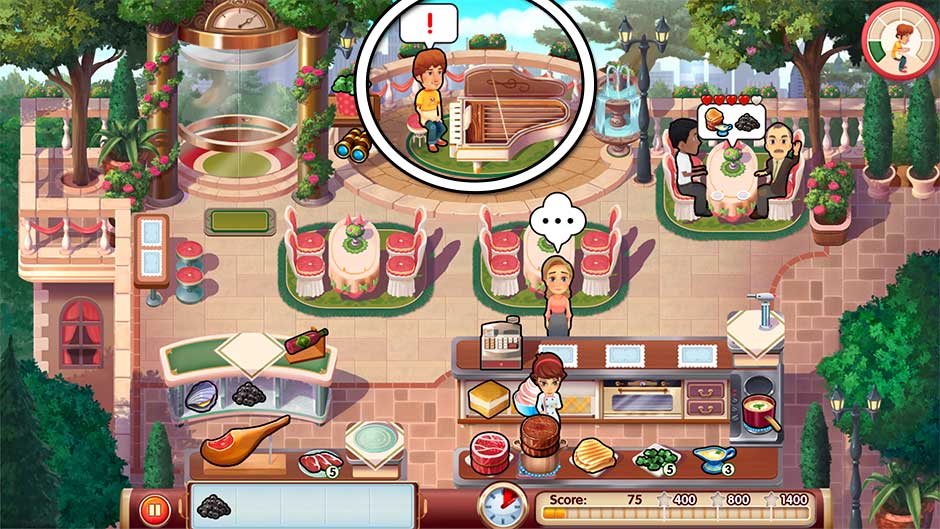
Mary le Chef – Cooking Passion – Level 45
Level 46 – Life Opportunity
Diamond Challenge: Time to put that education to good use and help my parents as much as I can.
Mouse Location: Click here to view mouse locations for this restaurant.
Mary’s got the extra task of sorting through paperwork today. The papers are located on the lower left. Click on them to have Mary read through them. A bar will appear indicating her progress. Finish reading through all the papers before the end of the day to complete today’s diamond challenge.
Tip! Study those papers every spare chance you get. Between waves of customers is perfect.
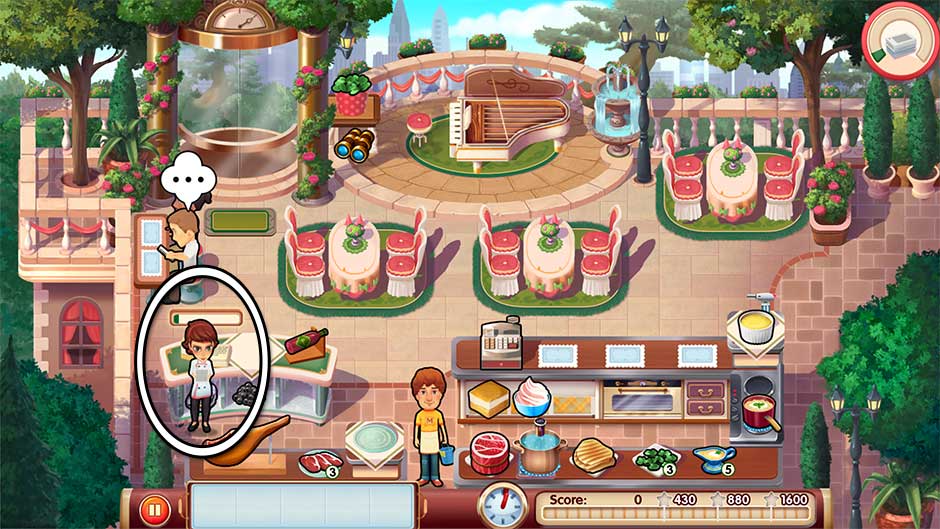
Mary le Chef – Cooking Passion – Level 46
Level 47 – Ups and Downs
Diamond Challenge: The path to a frozen item is with an ice pick.
Mouse Location: Click here to view mouse locations for this restaurant.
The bar in the lower left corner has gone a bit icy! Quickly have Mary chip away the ice over each of the lower shelves as quickly as possible. Customers will start ordering chilled items right away, so there’s not a moment to spare! A meter will pop up over Mary’s head indicating her progress. Clear away all the ice before the end of the day to complete today’s challenge.
Tip! It’s very likely your first customer(s) will order items from the bar. If you can’t get them to them in time and they leave angry, that’s ok! It’s better to clear the ice for the next customers and keep them happy than to serve more than one angry customer.
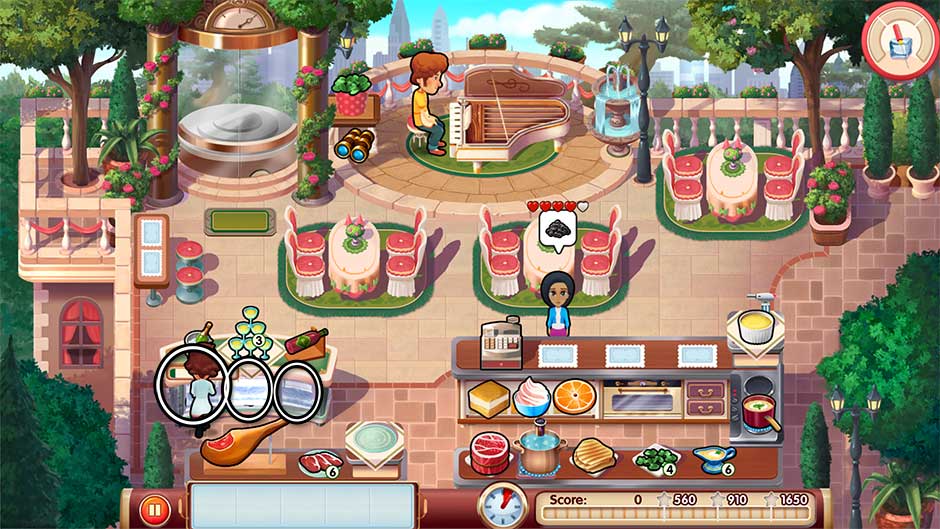
Mary le Chef – Cooking Passion – Level 47
Level 48 – Change of Heart
Diamond Challenge: It’s less of a hassle with a drink by the handle.
Mouse Location: Click here to view mouse locations for this restaurant.
Serve sitting customers their drinks before their food. When a sitting customer orders a drink, make sure you serve them the drink, then prepare their food and give it to them on a separate trip. The extra wait can make other customers cranky, so use Morey’s musical talent at the piano to keep them happy. Remember this only applies to customers sitting at tables. Do this successfully by restaurant close to complete today’s challenge.
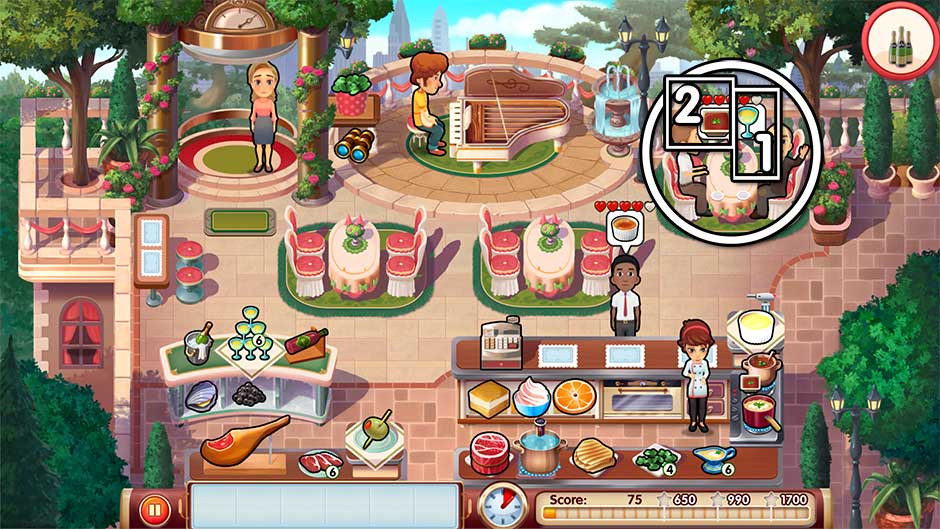
Mary le Chef – Cooking Passion – Level 48
Level 49 – Judgement Day
Diamond Challenge: The results arrive today – don’t lose your head about it.
Mouse Location: Click here to view mouse locations for this restaurant.
Keep an eye out for the postman today! The postman will arrive on the right side of the restaurant very quickly after restaurant opening. When he does, a “!” bubble will appear over his head. Click on him quickly to immediately complete today’s challenge. If you miss him, don’t worry! He’ll be back and attempt to redeliver the results throughout the day.
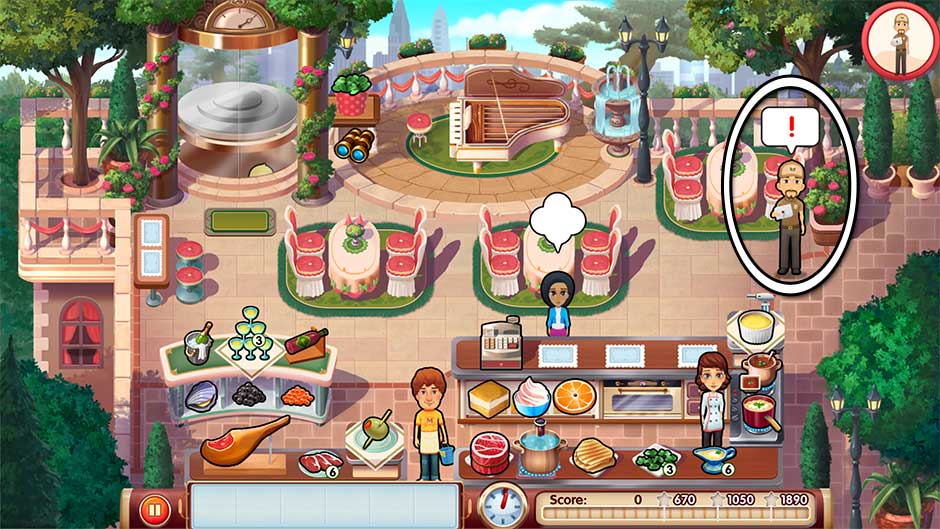
Mary le Chef – Cooking Passion – Level 49
Level 50 – Facing Friends and Family
Diamond Challenge: Let’s see how much we’ve grown.
Mouse Location: Click here to view mouse locations for this restaurant.
Get the first star before half the day is over. Serve customers as per normal, but try to serve them quickly and check them out in larger groups where possible. Keep a sharp eye on the clock at the bottom of the screen and make sure you’ve checked out and served as many people as possible before the clock hand points straight down. Do this successfully and you’ll earn the final diamond for this restaurant.
Tip! Make sure you’ve purchased any and all restaurant upgrades you can afford to increase customer patience and tips. You can purchase upgrades after clicking Play in the Map, and before clicking Play in the level preview. You will also want to upgrade to any menu items that increase tips, and thus your score.
Chapter 6 – Steve’s Backyard
There’s nothing quite so luxurious as Steve’s own backyard. Finally, some time off! Well… sort of, anyway.
Level 51 – Rise to the Occasion
Diamond Challenge: Finally, a stressless day.
Mouse Location: Click here to view mouse locations for this restaurant.
Keep serving your family and friends throughout the day. The tables are filled with your family and friends, which means standing room only for today’s customers! Serve your friends and family as you would any normal customer. Be sure to keep them happy by serving them in a timely manner, and with full orders on your tray. Play as you would normally, and you should have no trouble at all earning today’s diamond.
Level 52 – Finding Our Way
Diamond Challenge: Being on the phone drains a lot of battery. They sure don’t make them like they used to…
Mouse Location: Click here to view mouse locations for this restaurant.
Help Steve with his phone while he sunbathes. Throughout the day, Steve’s phone will ring. It’s located on the counter in the lower right corner. When this happens, click on the phone and take it to Steve. Once he’s done talking, a bubble will pop up over his head, indicating you will need to click on him and take the phone back to the charger on the lower right. Repeat this process 4 times over the course of the day to complete today’s diamond challenge.
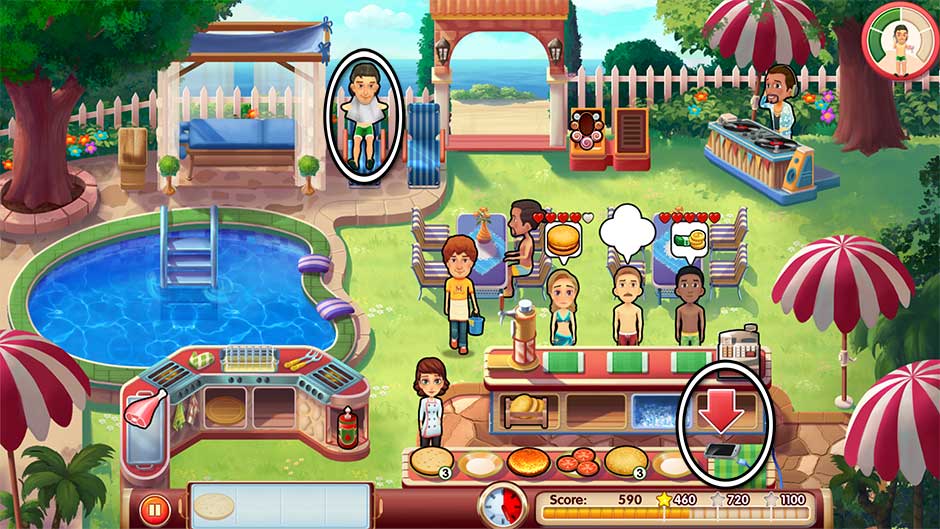
Mary le Chef – Cooking Passion – Level 52
Level 53 – Sizzle City
Diamond Challenge: Time to see the lazy young genius show off his kitchen magic.
Mouse Location: Click here to view mouse locations for this restaurant.
Steve’s cooking may be unparalleled, but so is his laziness! Help Steve pull off a little kitchen magic by collecting the components he needs to create his recipe. A bubble will pop up over his head showing which item he needs. You will then need to locate that item, click on it, and bring it back to him. Find all 4 items and bring them back to him when he asks today to earn yourself a diamond. The item locations are pictured below:
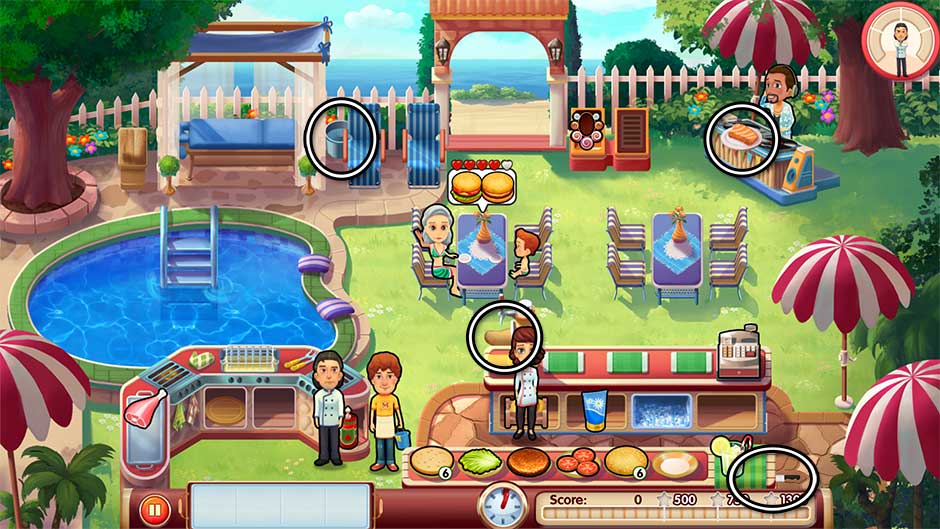
Mary le Chef – Cooking Passion – Level 53
Level 54 – True Passion
Diamond Challenge: Well beyond the 5 seconds rule.
Mouse Location: Click here to view mouse locations for this restaurant.
Pick up the burger parts you knocked out of Morey’s hands. There are 5 pieces total scattered throughout the yard. Pick up all 5 before the end of the day to complete your goal. Their locations are pictured here:
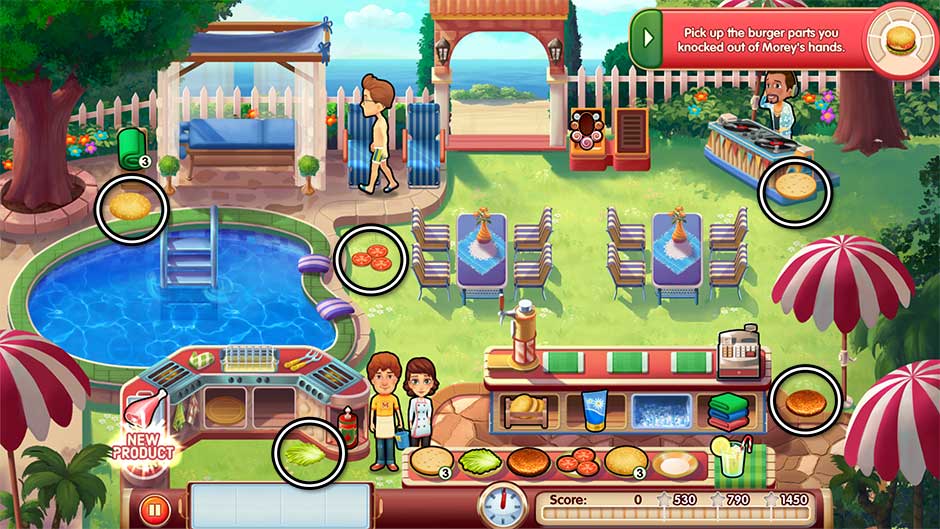
Mary le Chef – Cooking Passion – Level 54
Level 55 – Hot Stuff
Diamond Challenge: Let’s see if the groom-to-be can handle the spice.
Mouse Location: Click here to view mouse locations for this restaurant.
Serve Tony everything he asks for. He will be sitting at the rightmost table with Jennifer today. Treat him as you would any other customer, only try to place priority on serving him first when possible. You’ll want to keep him happy today. Use the DJ as needed to improve customers’ moods. Serve Tony everything he asks for and you’ll receive a diamond at the end of the day.
Tip! Purchasing upgrades in the Store and upgrading your menu are excellent ways to increase Tony’s patience and keep him happy.
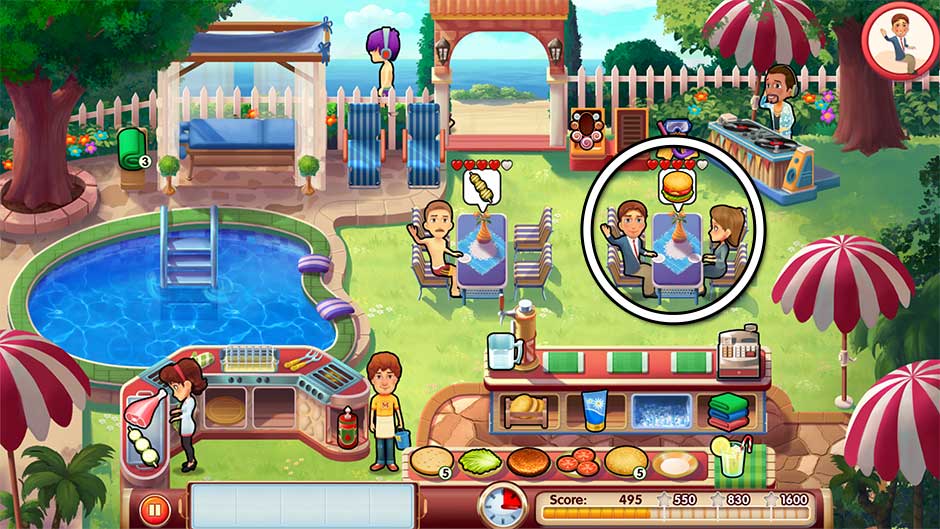
Mary le Chef – Cooking Passion – Level 55
Level 56 – Coming Together
Diamond Challenge: Laziness is the mother of all bad habits.
Mouse Location: Click here to view mouse locations for this restaurant.
Make sure Steve sticks to his schedule. In typical fashion, he’s lounging in one of the chairs near the yard entrance. Whenever a “!” bubble pops up over his head, click on him to have Mary confront him about his planning. Do this 5 times before the end of the day to complete your goal.

Mary le Chef – Cooking Passion – Level 56
Level 57 – Biggest Fan
Diamond Challenge: Bring the food and the games.
Mouse Location: Click here to view mouse locations for this restaurant.
Have Morey try to entertain the customers, success not guaranteed. Click on Morey, then click on one of the customers sitting at a table to have him go to them and attempt to make them laugh with a joke. If it works, it will count toward today’s goal. If it doesn’t, click on Morey once he’s returned to the DJ booth, then click on a table customer to have him try again. If Morey can tell jokes successfully 5 times, you will earn today’s diamond.
Tip! Morey can try to tell jokes to the same customer over and over again. There is no limit to a customer, only that they must be sitting, so go wild!

Mary le Chef – Cooking Passion – Level 57
Level 58 – Keeping It Together
Diamond Challenge: James is looking for investors, but losing hope.
Mouse Location: Click here to view mouse locations for this restaurant.
James is having a difficult time pitching his business ideas today. Whenever he loses hope, he’ll walk over to the area near the DJ booth and sulk. A “!” bubble will appear over his head when this happens. When you see this, click on James to have Mary walk over and encourage him. Do this 5 times before restaurant closing to complete today’s challenge.
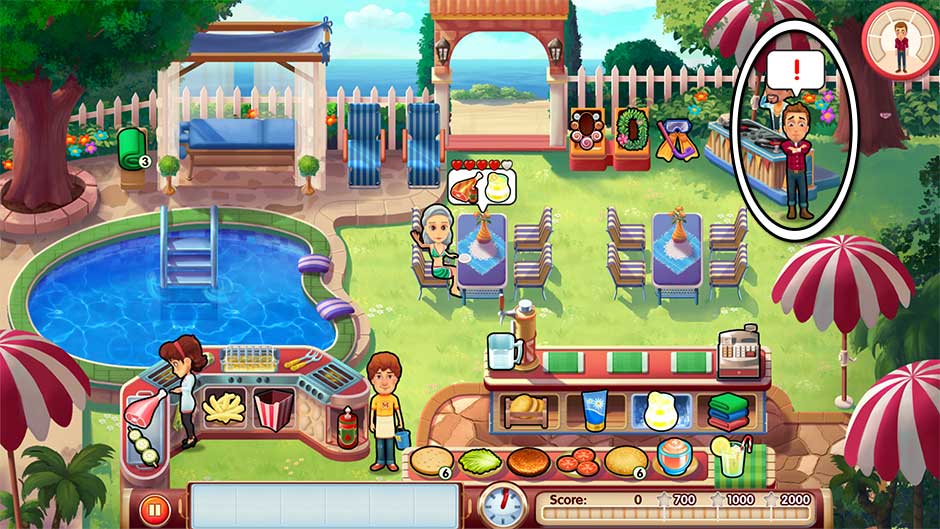
Mary le Chef – Cooking Passion – Level 58
Level 59 – Can’t Keep Up
Diamond Challenge: With Steve, every day is a mystery.
Mouse Location: Click here to view mouse locations for this restaurant.
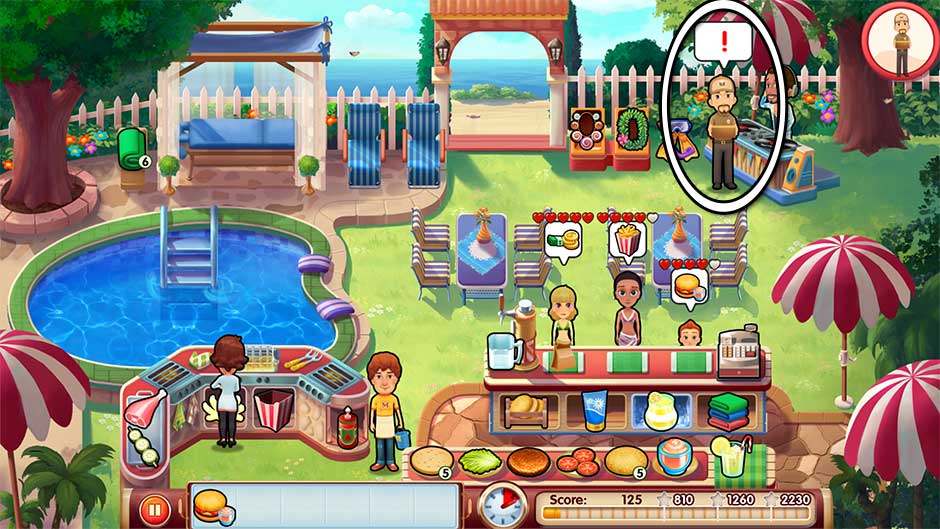
Watch out for the delivery. Another important package is set to arrive today. Keep an eye out for the postman, who will show up near the DJ booth. When he stops, a “!” bubble will appear over his head. Click on the deliveryman as soon as this shows up to pick up the package and complete today’s goal.
Tip! Did you miss the postman? Not to worry! He will attempt to deliver your package throughout the day, giving you another chance to catch him if you missed him the first time.
Mary le Chef – Cooking Passion – Level 59
Level 60 – Make It Work
Diamond Challenge: Won’t be much of a party without good tunes.
Mouse Location: Click here to view mouse locations for this restaurant.
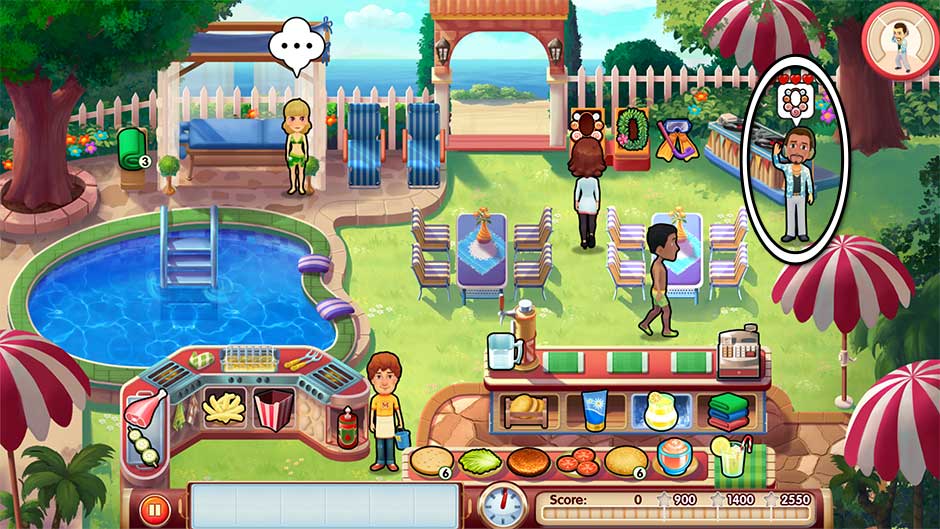
Give the DJ what he asks for. During the day, the DJ will take breaks from working the turntables. When this happens, he’ll briefly walk away from the booth and wave at you. A bubble with an item will appear over his head. When this happens, quickly pick up the item he orders, then bring it to him. Do this successfully 3 times before day’s end to complete the final diamond challenge.
Mary le Chef – Cooking Passion – Level 60
Congratulations! You’ve completed Mary le Chef – Cooking Passion!
Bonus Levels
There are a total of 30 Bonus levels in the game, 5 per restaurant, all of which can be found in the level select map. This section outlines every bonus challenge – what it is, how to beat it, and tips and tricks along the way.
Bonus 1 – Impatience is No Virtue!
Diamond Challenge: Everybody’s in a rush! Customers get impatient really fast!
Customers are less patient today. That means you’ll have to manage your time more carefully. Serve full orders and try to chain orders together. You have 5 slots on your tray today, so don’t hesitate to use each and every one of them!
Bonus 2 – Combo Fiesta
Diamond Challenge: Only by completing multiple orders together can you earn points.
Points can only be earned via combos today. Serve a minimum of 2 customers at once. Full orders are a must today. The same goes for checking customers out at the register – try to make sure there are at least 2 people at the register when you click on it.
Tip! Bonus points earned from upgrades and menu items with bonus tips will still count toward your score, regardless of whether or not you serve multiple customers back-to-back. Serving customers quickly will also count toward your score regardless.
Bonus 3 – Think Fast!
Diamond Challenge: Something’s off – everything seems to be happening faster!
Keep up with the fast pace! Everything is happening faster today. Treat today like you would any other day, only try not to get too flustered! If you find things are happening too quickly, try focusing on one customer at a time instead of large groups. The plus side of everything being faster is that before you know it, the day will be done!
Bonus 4 – Flyers Away!
Diamond Challenge: The party’s just around the corner – make sure no customers leave the restaurant without a flyer.
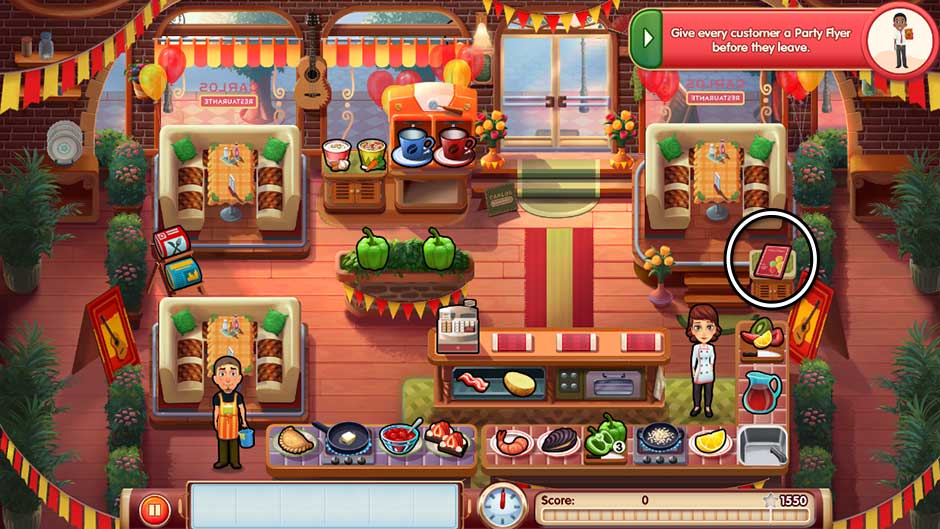
Give every customer a party flyer before they leave. The party flyers are located on the right, just below the upper right booth. Click on a flyer to add it to your tray. The best way to give a customer a flyer is to give it to them with their order. For example – if a customer orders coffee: pick up the flyer, then the coffee, and serve both to them at once while they’re at the register.
Table customers are an exception. Bring 1 flyer to the table with a table’s order. When a customer from that table goes to the register to check out, pick up another flyer, then give that flyer to them before clicking on the register, just as you would any of the walk-in customers.
Tip! A “!” bubble will appear over the stack of flyers on the right when you’ve forgotten to give a flyer to someone at the register and they’ve already received their order. Quickly pick up a flyer and click on customers to figure out who it is. A customer who has already received a flyer won’t take another one.
Tip! Keep an extra flyer on your tray today, just in case!
Mary le Chef – Cooking Passion – Bonus Level 4
Bonus 5 – A Snail’s Pace
Diamond Challenge: Mary is tired and overworked, but still pushing on to do a good job.
Mary will work slower today. As a result, it’s very easy for orders to back up. To prevent this, make sure to invest in the coffee machine upgrade prior to playing this level. This will allow you to prepare cups of coffee in advance, without them spilling over. Try to bundle orders in such a way that you’re picking up items in the same sections of the restaurant. For example: If two customers order newspapers, pick up the newspapers for both orders at the same time.
Tip! Use the cash register as a sort of checkpoint. If Mary’s not moving, click on the cash register to have her wait there for the next order.
Bonus 6 – A Change of Mind
Diamond Challenge: People these days just don’t know what they want!
Watch out for customers who change their minds! Keep an eye out for the order bubbles over a customer’s head. If the item they had asked for disappears and a “…” takes its place, it means that customer is about to change their order. Stop whatever order you were preparing for them and wait for them to decide on their new order.
Tip! If you end up with the wrong item on your tray when a customer changes their order, click on the item to remove it from your tray.
Bonus 7 – The Mouse Trap
Diamond Challenge: Catch all the mice!
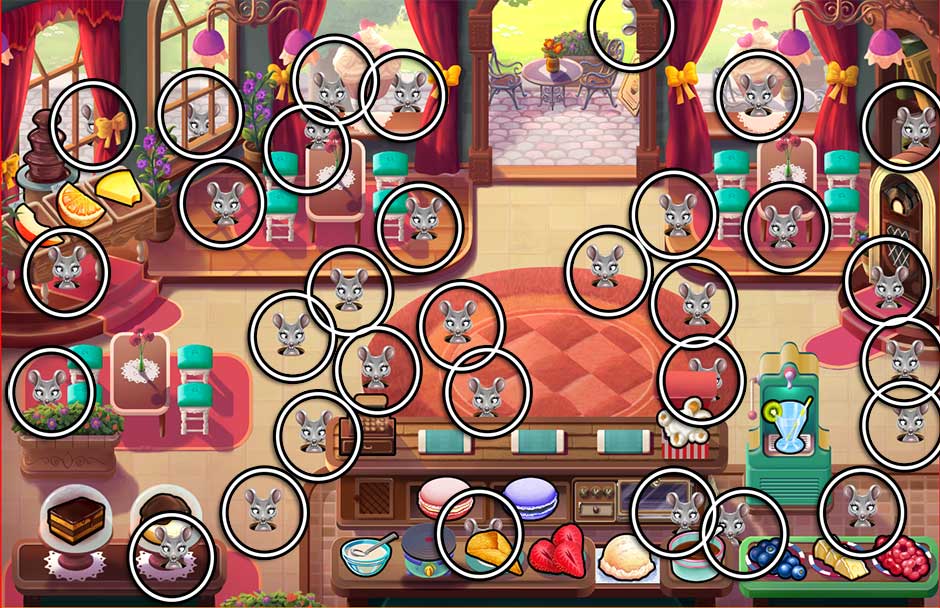
Catch the mice quickly! Mice will pop up all over the restaurant today. Catch 15 of them before the restaurant closes to complete today’s goal. You will hear a squeaking sound every time a mouse appears. Mice can pop up in any of the locations pictured here:
Mary le Chef – Cooking Passion – Bonus Level 7
Bonus 8 – Crowd Control
Diamond Challenge: It’s one of those days – either it’s empty, or it’s filled to the brim!
Manage the large groups of people. Customers will come in waves today. Between waves, the restaurant will be quiet, but when a wave arrives, it’ll be at full capacity in no time. Serve complete orders to keep customers happy and make sure you keep your crepes fully stocked. If you need an extra boost, use the jukebox to keep customers happy while they wait.
Tip! Investing in restaurant upgrades that increase patience is an excellent idea today, as well as any menu items you’ve unlocked that do the same.
Bonus 9 – Expiration Date
Diamond Challenge: Today is not your day. All of the food seems to be going bad rather quickly…
Deliver everything before it goes bad. All the products today are fresh and have very short shelf lives. To keep products from going bad, focus on serving only 1 customer or table at a time. Trying to serve customers in combos risks your food going bad, so it’s better to play it safe. As soon as you’ve picked up an item for a customer, make sure you pick up any and all remaining items for their order and deliver it to them right away! Once a customer has received their order, it will no longer risk going bad. So if you’d still like to chain customer check-outs at the register, feel free.
Bonus 10 – Forgive and Forget
Diamond Challenge: Some customers will not be able to pay. Succeed despite this!
Not everyone will be able to pay for their orders today. That means the key to obtaining high scores is to try and perform as many combos as possible. You can do this by serving orders quickly, serving full orders, serving customers back-to-back, and checking out customers in groups. You can also custom tailor your menu to have items that will provide you with bonus tips. Utilize these tips and tricks, and you should have no problem completing today’s challenge.
Bonus 11 – Child’s Play
Diamond Challenge: Bumping into kids makes you drop the items on your tray!
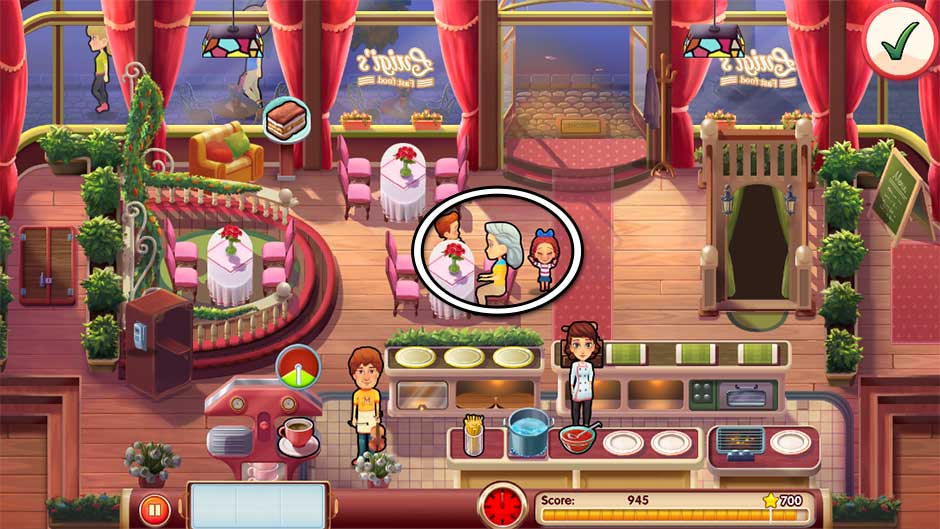
There are 2 children running around the center table today. If you run into them while carrying items on your tray, you’ll end up dropping them. Watch for the gap when they run by whenever you need to get over to the other side or serve a nearby customer.
Tip! Don’t worry about the children if you have nothing on your tray. If there’s nothing on your tray, you can cross paths with them without having to worry about them slowing Mary down.
Mary le Chef – Cooking Passion – Bonus Level 11
Bonus 12 – The Customer is King
Diamond Challenge: Some customers will be unhappy with what they’re served – make it right with a new dish!
Customers will request new orders, but they’ll only pay for one. This is most likely to happen with a table full of customers. After serving their full order, they’ll almost immediately order another. A customer’s hearts will not be filled with the first order, so you’ll need to be quick to fulfill the second. Place priority on serving these customers as quickly as possible. Customers at the register are a lower priority today.
Bonus 13 – A Clean Slate
Diamond Challenge: Word is the Health Inspector is in town. Keep the restaurant extra clean!
Clean tables within 8 seconds of customers leaving. Morey isn’t around to help, so it’s entirely up to you! As soon as a table is ready for cleaning, a “!” bubble will appear over it. Quickly click on the table and clean it, before checking out the customer that goes to the register. The time needed to clean a table counts toward the 8 seconds, so wait no longer than 4 seconds to click on a table and start cleaning it once the “!” has appeared.
Bonus 14 – Space Control
Diamond Challenge: You picked the broken tray, but there’s no time to change it. Make the best out of it.
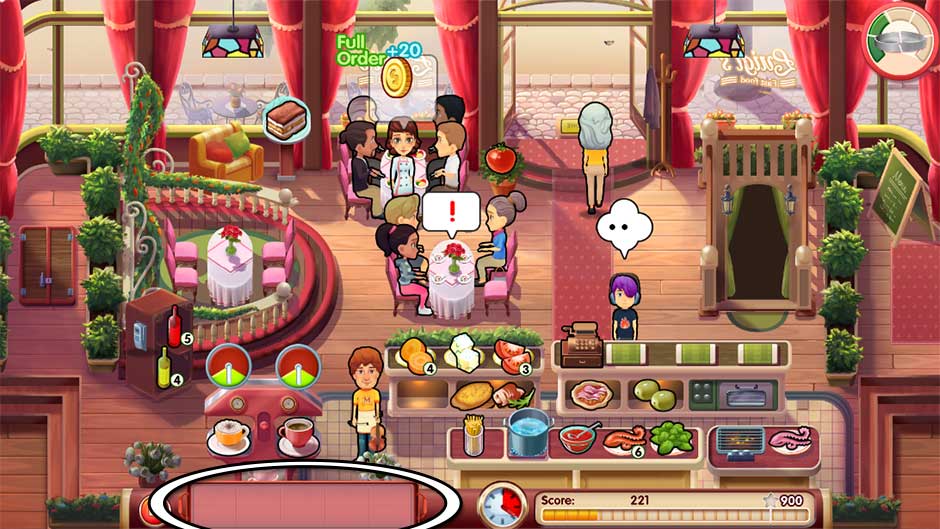
Your tray is slowing breaking – stick with it! You’ll start the day with 6 spots on your tray. However, the tray will start breaking almost right away. Whenever the tray breaks, 1 spot will be removed. You’ll have warning when this is about to happen – the tray will start blinking red.
Serve customers as per normal, but take the broken tray into account. By the time the day is halfway done, you’ll only have 3 spots left on your tray. Before you reach the final quarter, only 1 slot will remain. You will need to make multiple trips to fulfill orders, so try to make sure everything is fully stocked and ready to go before this happens in order to manage your time.
Mary le Chef – Cooking Passion – Bonus Level 14
Bonus 15 – First Come, First Serve
Diamond Challenge: Serve the customers as they come in, no cutting in line.
Serve the customers in the same order as they enter the restaurant. Keep an eye on customers coming in and serve them as quickly as possible to prevent any customer back-up. Remember to restock all your items at the start of the day so you don’t lose track of customers while restocking.
Tip! Keep your cursor hovered over the next customer you’re serving. This will help you keep track of the order they need to be served when you’re not busy bringing them their meals.
Bonus 16 – Waste Not, Want Not
Diamond Challenge: Have no extra items on your tray that have to be removed.
Don’t throw away food or leave extra food on your tray. Make food only as customers order. If you feel the need to play things safe, serve 1 customer at a time.
Bonus 17 – Order Up!
Diamond Challenge: Serve only complete orders to your customers.
Serve a customer their entire order at once. You will have 4 slots on your tray today. As such, don’t combine customers’ orders unless they’re at the counter. If a table is ordering, focus on serving them alone.
Bonus 18 – Please Don’t Stand Up
Diamond Challenge: Morey is trying his hand at stand up – you’ll have to run the market on your own!
Keep the market running without Morey’s help. This means there won’t be anyone to help you clean tables today. Focus on serving customers as per normal, but every chance you get, clean the tables. The priority is to serve customers before cleaning tables. However, if all the tables are occupied and/or dirty, make sure you stop serving customers for a moment and keep at least 1 table clean. Otherwise, if a new table of customers walks in, they will immediately leave.
Bonus 19 – Chicken Eggony
Diamond Challenge: Delicate eggs break easily; gather them before they do.
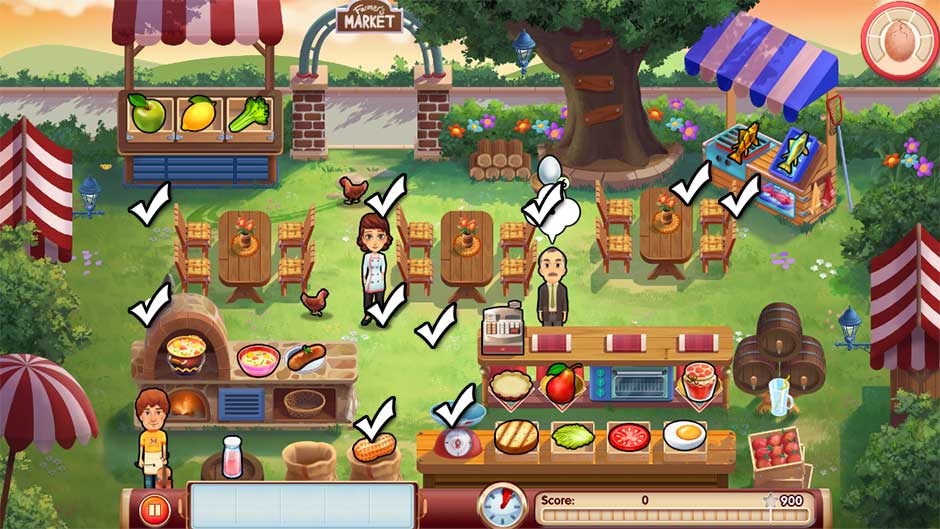
There are 2 chickens running around the market today. Both will lay eggs on the grass at random, and they will do this frequently. Make sure to click on the eggs quickly! If you don’t click on an egg within a few seconds, it will crack and count as a strike against you. If 5 eggs break before day’s end, you will fail today’s challenge. Serve customers quickly, but eggs are your priority. Be aware that eggs can be laid behind customers’ order pop-ups, so keep a close eye on those chickens! A screenshot showing common egg-laying locations is pictured below.
Tip! As soon as you see an egg, click on it! Even if Mary is busy serving a customer or rekindling the fire, as long as an egg has been clicked, it won’t crack, even if it takes several seconds for Mary to catch up on the task. You can tell if an egg has been clicked if it’s blinking.
Mary le Chef – Cooking Passion – Bonus Level 19
Bonus 20 – Ka-Ka-Ka-CHING!
Diamond Challenge: The cash register keeps jamming!
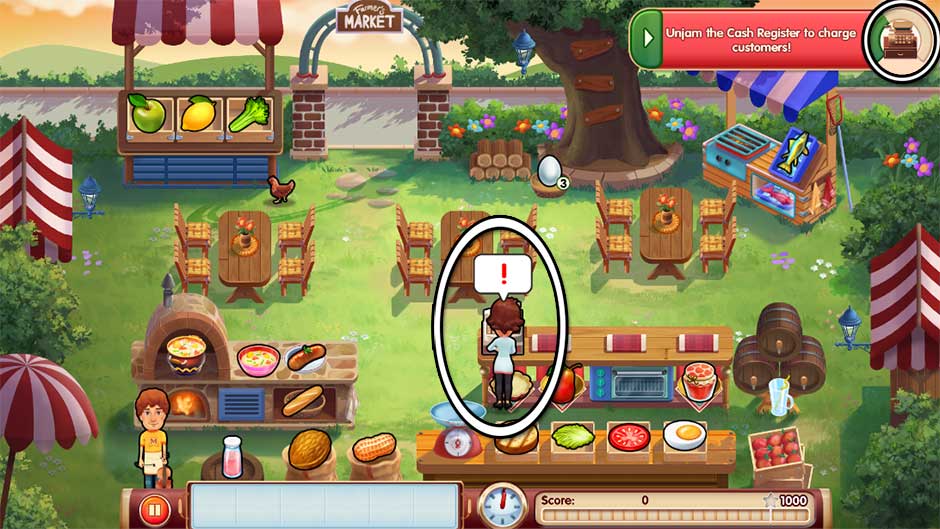
Unjam the cash register to charge customers. The cash register will jam every handful of seconds. Your best strategy for this level is to only unjam it if you’ve got nothing else to do, or if you’re about to check out a customer at the register. If you interrupt the task of unjamming the register, it will almost immediately fully jam again. Don’t worry too much if you see the “!” appear – only when you’re actually checking out a customer.
Mary le Chef – Cooking Passion – Bonus Level 20
Bonus 21 – Oh Happy Day
Diamond Challenge: What’s the point of cooking if your customers aren’t happy when they leave? Show them the best service.
Make sure every customer leaves happy. Serve customers quick, full orders to keep them happiest. Your goal is to have every customer leave with 4-5 hearts over their head.
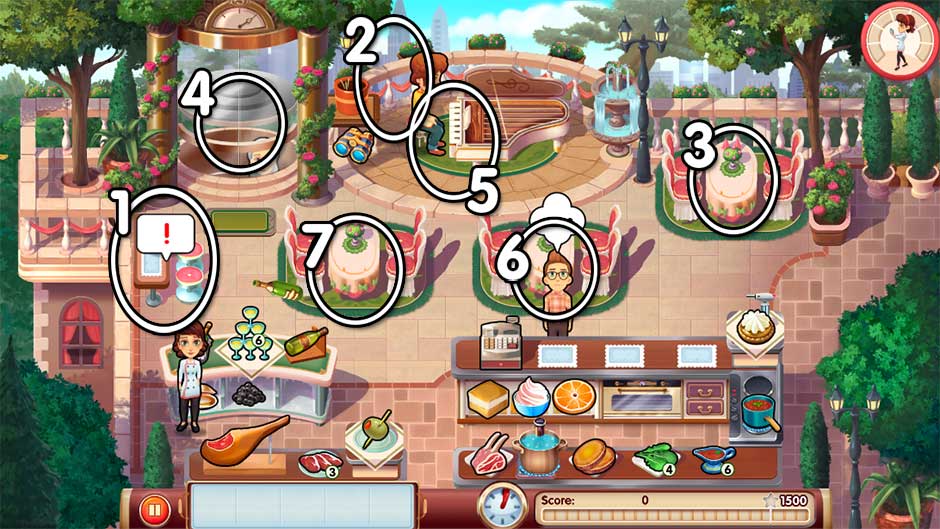
Tip! If a customer stands next to the piano, they will order only one thing – the binoculars. You can click on the binoculars to pick them up and wait by them a moment if you see a customer with the “…” bubble here. They are guaranteed to ask for them within a few seconds.
Tip! Try to have at least 1-2 fully prepped portions of meat on your tray and ready to go. This is the only item today that requires preparation, so stay ahead of the game and you won’t ever have to worry about customers waiting long!
Bonus 22 – ANOTHER!
Diamond Challenge: Table customers can’t get enough of the food, and just keep ordering more.
The table customers will order more than once. Just keep serving! Keep the meat on the left restocked by clicking on the large leg. Use the binoculars trick mentioned in the bonus level above, and prep meals as per normal. Morey can also help keep customers patient with the piano. Using these tricks, you shouldn’t have too much trouble finishing service today with flying colors.
Bonus 23 – Fast Food
Diamond Challenge: Working in a top notch restaurant requires top notch service! Serve your customers their whole orders quickly!
Serve a Quick and Full Order at least 3 times. To serve a quick order, give a customer their complete order within the first few seconds of them ordering. Full Orders are made by delivering all the items a customer ordered in a single trip. It’s possible to achieve both these things at the same time. Whenever you’re not busy serving customers, restock your items to help you more easily achieve today’s goal.
Bonus 24 – Shooting for the Stars
Diamond Challenge: Steve wants perfect magazine pictures by the end of the day. Better bring out those photography skills of yours.
Shoot the photos at the perfect moments. A “!” bubble will appear in various locations around the restaurant today. When these appear, click on the bubble to have Mary go there and shoot the perfect picture! Mary does not have to do this immediately, but you’ll want to do it quickly nonetheless. You will need to take 7 photos before the restaurant closes in order to complete today’s challenge.
Mary le Chef – Cooking Passion – Bonus Level 24
Bonus 25 – You Better Watch Out!
Diamond Challenge: Keep aware of your surroundings.
Food takes longer to cook, but overcooks quicker, and drinks spill over more frequently. Make items that can burn or spill made-to-order only. This will help minimize accidents. Furthermore, purchase any final upgrades for the restaurant you may not have already. This will help Mary move faster and customers to be more patient.
Bonus 26 – Critic-al!
Diamond Challenge: Food critics are in the house tonight. Keep them happy, or get booted by Steve… again.
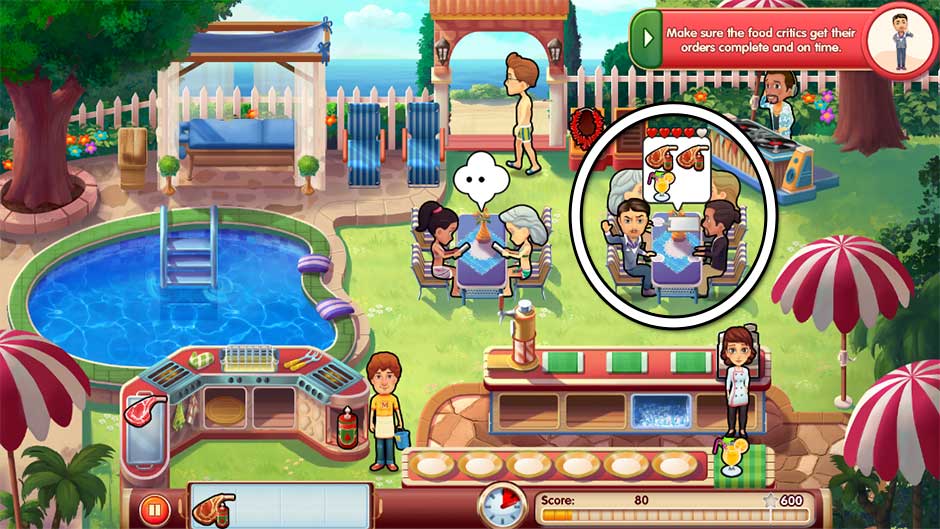
Make sure the food critics get their orders complete and on time. The critics are sitting at the rightmost table. Serve everything they order to them in a single trip to serve them a full order. They will order multiple times today. Use the DJ on the upper right to help keep them patient. Otherwise, focus on serving the critics when they order before any other customers.
Mary le Chef – Cooking Passion – Bonus Level 26
Bonus 27 – Marywatch
Diamond Challenge: Don’t let the kids get too close to the pool.
There’s a red-haired girl with a blue bow who’s fascinated with the pool. She will start out near the rightmost table. As soon as she starts to move, it will be directly to the pool on the left. As soon as she moves to the pool and a “!” bubble pops up over her head, drop everything and click on her right away. You will only have a few seconds to respond when she reaches the pool, so keep a sharp eye out! She will continue to go back to the pool repeatedly throughout the day. Prevent her from getting too close for too long by the time the restaurant closes, and you’ll earn today’s diamond.

Mary le Chef – Cooking Passion – Bonus Level 27
Bonus 28 – Long Overdue
Diamond Challenge: Table customers will not leave unless prompted.
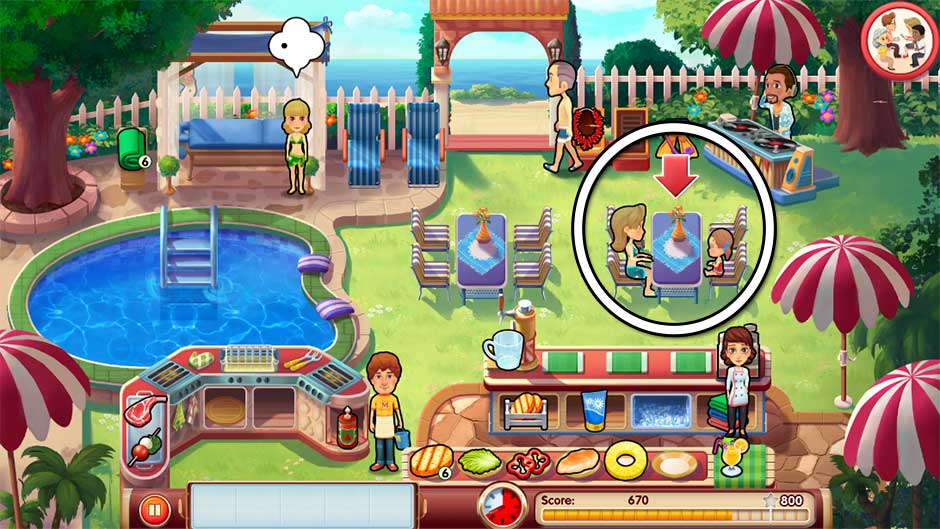
Table customers are taking their time today. When a table has finished eating, one member of the group will go to the cash register to pay. Once you’ve checked them out, that same customer will go back to the table and sit down. A “!” bubble will appear. Click on the table to have Morey clean it. Once Morey is done cleaning, click on the table again to have Mary go to the table and ask the customers to leave. If you’re not careful, customers not leaving will prevent new customers from sitting down. However, if you stay on top of things, you will have no trouble completing today’s task.
Mary le Chef – Cooking Passion – Bonus Level 28
Bonus 29 – Burn Baby Burn!
Diamond Challenge: Don’t burn any food, and don’t let any drinks spill over!
Cook everything to perfection, no exceptions! Be very careful as you multi-task today. If you need, take a moment whenever you’re cooking something that can burn or when filling a pitcher than can spill. It’s better to be safe than sorry. Use the DJ to help keep customers happy as you focus on delivering absolute perfection.
Bonus 30 – Up Your Game
Diamond Challenge: Don’t burn food, spill drinks, give incomplete orders, waste food, or let your customers be dissatisfied.
Play perfectly with no upgrades! Today’s bonus level is the ultimate challenge. There’s no upgrades, either restaurant or menu, to help you, and that includes Morey and the DJ! This means in addition to all the cooking, you’ll be doing all the cleaning. You will need to serve everything a customer orders in a single trip, without making any mistakes or removing any food from your tray. Keep your items stocked every spare chance you get. Good luck! Here’s a few tricks to help you conquer the ultimate challenge:
- If a customer is waiting by the pool, they will be waiting for scuba gear. Click on the scuba gear to have it ready for them before they’re done thinking.
- Make food made-or-order only. Do not keep any spare items on your tray.
- All burgers require the side of sauce. Don’t forget it!
- Make sure there is always at least 1 table clean. If a group of customers leave, you will fail today’s challenge.
- Keep the buns stocked by clicking on the basket beneath the left side of the counter. You can keep the towels stocked by clicking on the pile beneath the cash register.
- Customers do not need 4-5 hearts today. They only need to not leave angry without paying. If the customers start to become upset, don’t panic! You can still accomplish today’s challenge, even with unhappy customers.
Mouse Locations
There are a total of 60 mice which can be found throughout levels 1 – 60, excluding Bonus levels. Unlike mice in Delicious, mice in Mary le Chef are random per day, and can pop up in a number of locations. The following section shows every possible place a mouse can pop up in any given restaurant on any given day.
Chapter 1 – Carlos’ Restaurant
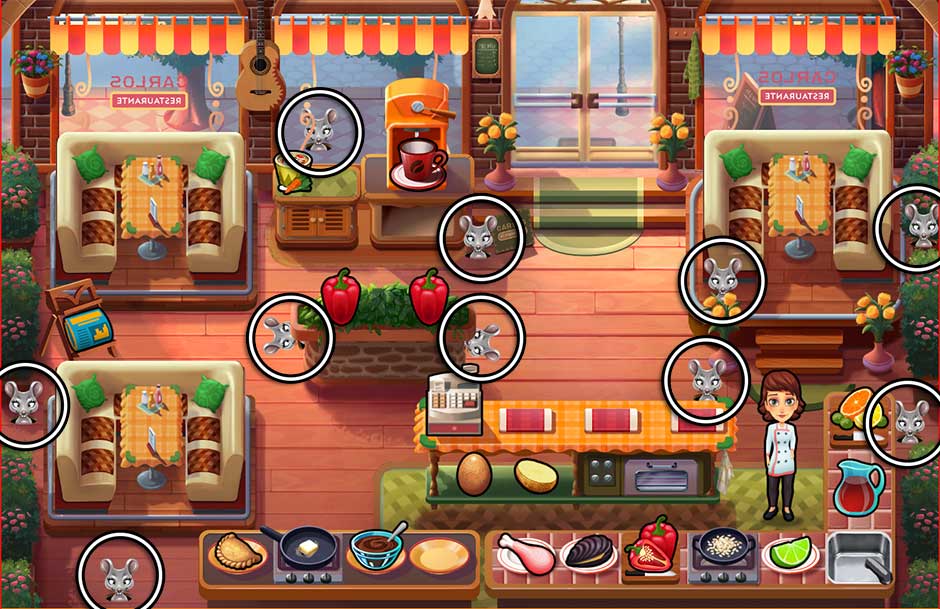
Mice are randomized and can pop up in any of these locations during levels 1 – 10:
Mary le Chef – Cooking Passion – Mouse Locations – Carlos’ Restaurant
Chapter 2 – Sophie’s Restaurant
Mice are randomized and can pop up in any of these locations during levels 11 – 20:
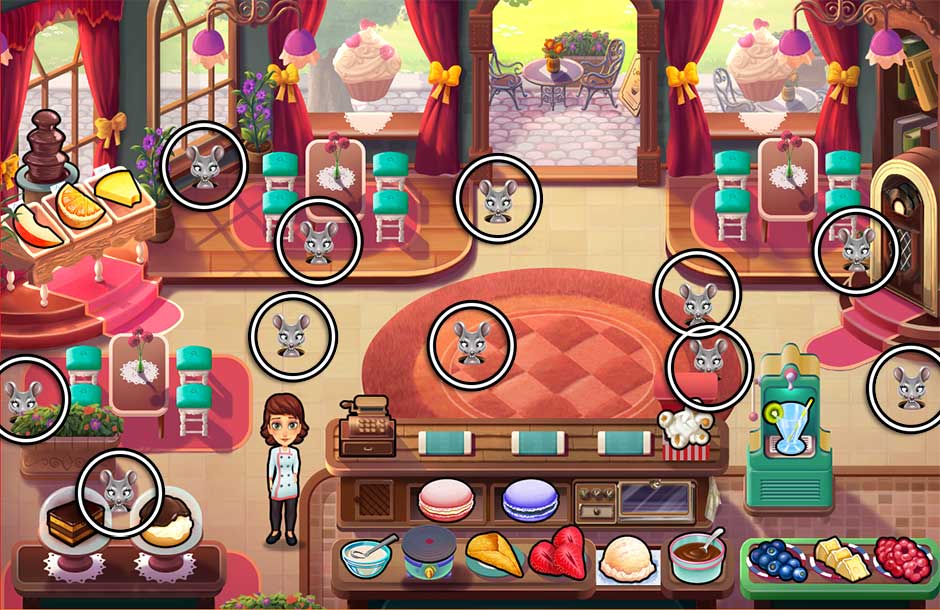
Mary le Chef – Cooking Passion – Mouse Locations – Sophie’s Restaurant
Chapter 3 – Luigi’s Restaurant
Mice are randomized and can pop up in any of these locations during levels 21 – 30:
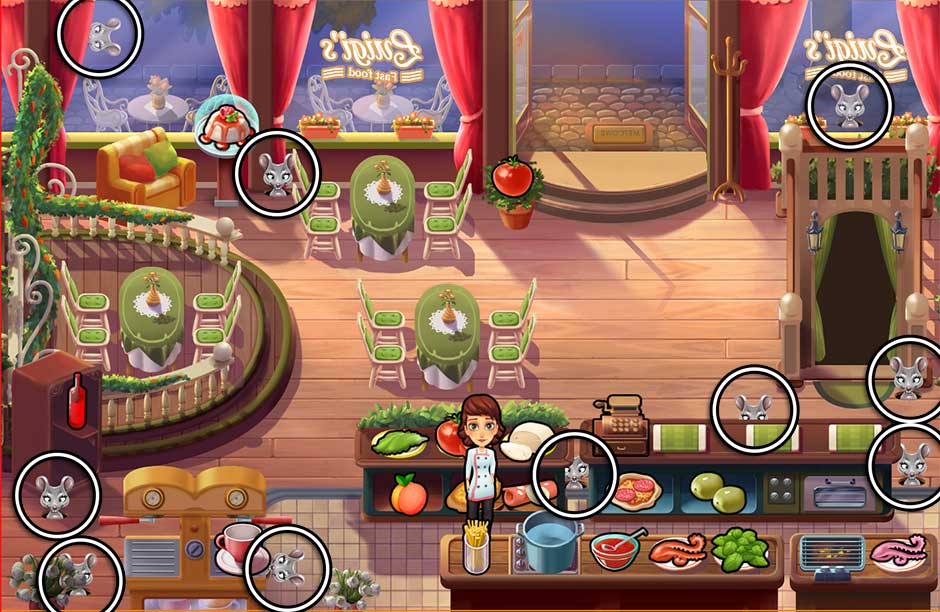
Mary le Chef – Cooking Passion – Mouse Locations – Luigi’s Restaurant
Chapter 4 – Farmer’s Market
Mice are randomized and can pop up in any of these locations during levels 31 – 40:
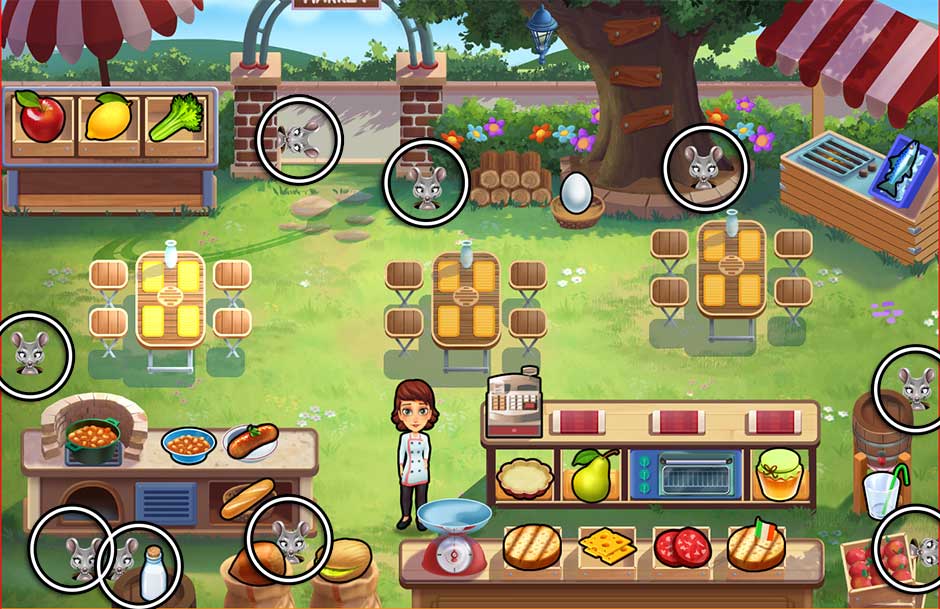
Mary le Chef – Cooking Passion – Mouse Locations – Farmer’s Market
Chapter 5 – Steve’s Restaurant
Mice are randomized and can pop up in any of these locations during levels 41 – 50:
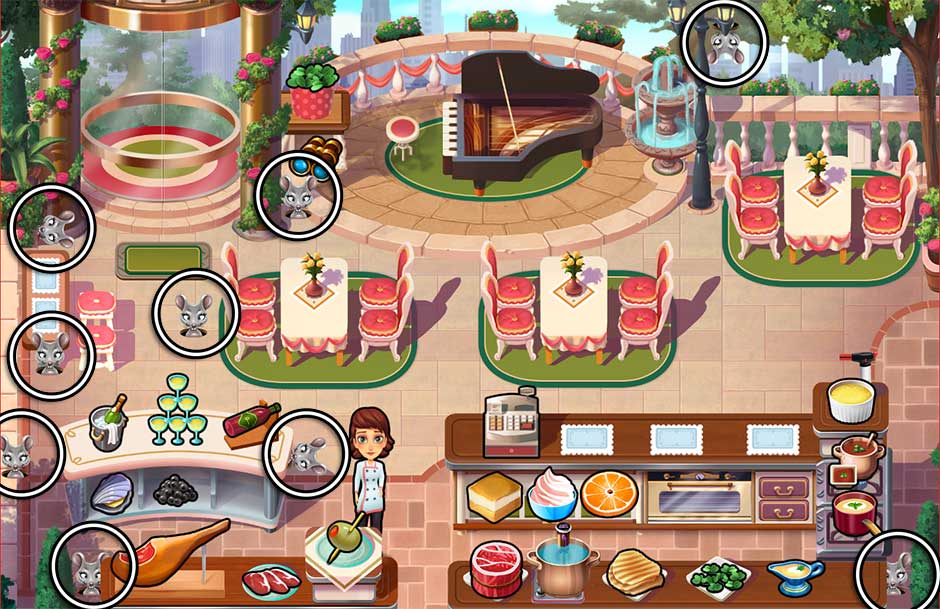
Mary le Chef – Cooking Passion – Mouse Locations – Steve’s Restaurant
Chapter 6 – Steve’s Backyard
Mice are randomized and can pop up in any of these locations during levels 51 – 60:
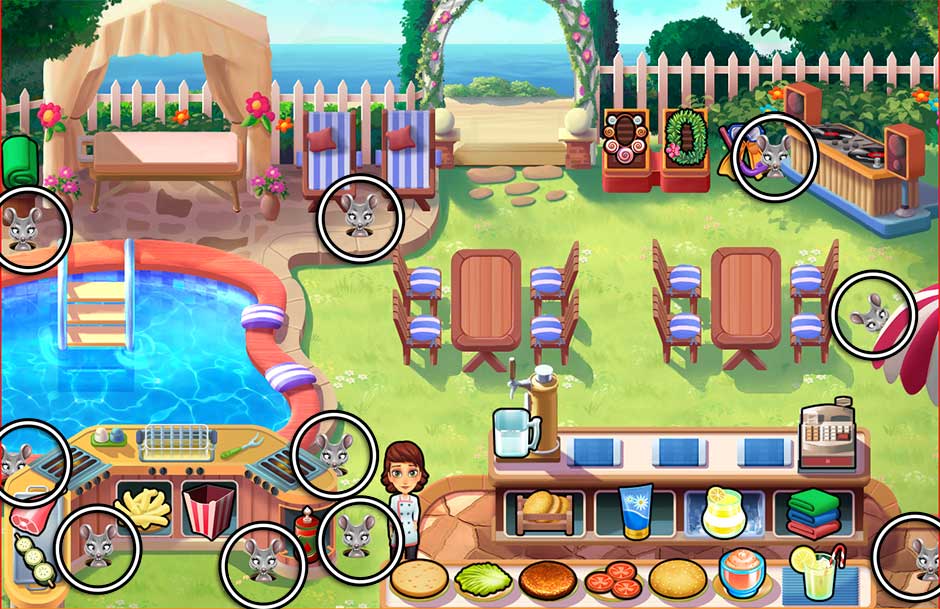
Mary le Chef – Cooking Passion – Mouse Locations – Steve’s Backyard
Trophies
Go for the gold with 21 unlockable trophies for your kitchen cabinet. This section names every trophy, as well as how to unlock each one.
| Trophy Name | Description | How to Unlock |
| Coffee Grinder | Finish chapter Carlos’ Restaurant. | Complete levels 1 – 10. |
| Wooden Spoons | Finish chapter Sophie’s Restaurant. | Complete levels 11 – 20. |
| Frying Pan | Finish chapter Luigi’s Restaurant. | Complete levels 21 – 30. |
| Aromatic Oil | Finish chapter Farmer’s Market. | Complete levels 31 – 40. |
| Knife Holder | Finish chapter Steve’s Restaurant. | Complete levels 41 – 50. |
| Spice Jar | Finish chapter Steve’s Backyard. | Complete levels 51 – 60. |
| Tea Box | Serve 400 customers quickly. | Serve customers their items immediately within a handful of seconds of ordering. Checking customers out quickly also counts toward speed bonuses. |
| Grandma’s Plates | Finish all tasks and bonus levels. | Complete every level in the game and all bonus level challenges. See walkthrough above for more information on how to complete each challenge. |
| Viola Flowers | Use every product and ingredient in every restaurant at least once. | Unlock new products by serving customers. You can check which products are on your menu after clicking Play in the Map, but before clicking Play in the preview screen per level. Unlock all products and serve all variations for each restaurant to unlock this trophy. |
| Strawberry Jam | Earn 200 bonus tips. | Earn bonus tips by serving customers quickly and by serving full orders. You can also earn additional tips through menu items marked with a green “!” in the Choose Your Menu screen prior to each level. |
| Mint Plant | Have 500 customers leave your restaurant happy. | Serve customers quickly and with full orders to increase their hearts. A 5-heart customer is a happy customer, and serving 500 of them will award you with this trophy. |
| Fresh Milk | Find all 60 mice. | Locate the mice hidden in all 60 levels of the game. See the Mouse Locations section of the walkthrough above for more information. |
| Power Mixer | Walk 1,000 meters/yards. | Walk a total of 1,000 meters while playing the game. Playing through the game normally should unlock this trophy without issue. |
| British Tea Kettle | Win the last level of every restaurant with only downgraded products. | Complete levels 10, 20, 30, 40, 50, and 60 each with the default menu items for each restaurant. |
| Fancy Pot | Achieve 3 stars on each level. | Achieve 3 stars on levels 1 – 60 to unlock this trophy. Excludes bonus levels. See the Video Walkthrough section for any pointers you may need. |
| Rolling Pin Trophy | Unlock everything and complete all levels with all stars. | Achieve 3 stars on levels 1 – 60 and 1 star on Bonus levels 1 – 30. Unlock all menu items by serving customers in each restaurant. Menu items are unlocked per restaurant. Refer to the walkthrough for more information per level, or scroll down to view the Video Walkthrough. |
| Kitchen Scale | Have 3 variations of one product on your tray. | This is most easily done during levels 33 – 40. Click on each variation of produce x3 (example – apple x3, lemon x3, and broccoli x3), followed by the combination of the three above (example – apple, lemon, and broccoli together). The trophy will unlock. |
| Chicken Timer | Find the golden egg. | Located in level 39. To get the golden egg: 1. Click on the 3 available chicken eggs to add them to your tray2. Click on the chicken to have it lay more eggs. There will be 6 new eggs in the nest.3. Add 3 more eggs to your tray so that it’s full. After adding the third, the golden egg will appear.4. Click on the golden egg to unlock the achievement. |
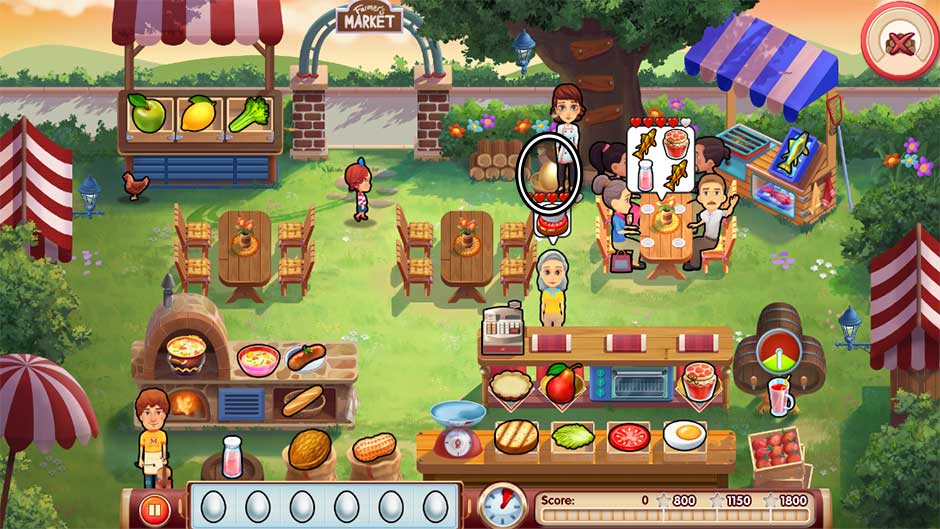
Mary le Chef – Cooking Passion Golden Egg
| Deluxe Blender | Unlock all menus. | Unlock every item on every restaurant menu. Unlock items by serving customers and replaying levels as necessary. |
| Hanging Garden | Spend all diamonds on gifts. | While in the level select Map, click on the Diamond icon in the upper right corner. After completing all diamond objectives on all levels and bonus levels, use the diamonds to unlock all of the presents in this room to complete the achievement. |
| Balsam Flowers | Buy all upgrades in all restaurants. | Buy all upgrades available via the Store menu per each restaurant. You can do this at the beginning of any level. |
Video Walkthrough

Didn’t Find What You Were Looking For?
We Can Help!
Whether you’re looking for additional help or your game isn’t working correctly, our Customer Service team is available to help.
Click here to send a support ticket!
The Mary le Chef – Cooking Passion Official Walkthrough is meant as a guide and does not contain hacks, serials, or cheats.
The post Mary le Chef – Cooking Passion Official Walkthrough appeared first on GameHouse.